As you start studying any musical instrument, you will quickly realize that scales are a topic that shows up frequently when discussing composition and improvisation.
Understanding and mastering scales is essential if you want to be able to create interesting melodies and improvise freely.
This KillerGuitarRigs guide will go over the most commonly used scales for guitarists, as well as some that maybe not all players will use frequently, but that you should at least be aware of.
Want to learn more about music theory?
Check out our ultimate guide to music theory to find more jumping off points.
Contents
- General Knowledge and Common Questions about Scales
- Most Frequently Used Scales – Overview and Guitar Patterns
- Scale Terminology: What do their names mean?
- More Frequently Found Scales you should know
- Less Common Scales Worth Learning
- Exotic Scales: Examples of Scales Found in Specific Contexts
- How to Learn and Practice Scales
- Glossary of Scale Terms
- Fret Number/Interval Quality Relationship on the Guitar
- Final Thoughts on Scales for Guitarists
General Knowledge and Common Questions about Scales
What is a scale?
A scale is a set of notes organized in a sequence that either ascends or descends in pitch. The number of notes can vary (although the most common is 7), as well as the intervals that exist between each note (also called scale degrees). Their names describe key features that define their sound.
What are scales used for in music?
The vast majority of music is written around a defined key center, which is connected to a scale. Scales represent the group of notes that you can use to compose melodies, improvise on top of a chord progression, and more. Knowing more about scales opens doors to creating more interesting music.
What are the best scales to learn on the guitar?
If you are just starting, you should focus on the major scale and the natural minor scale first, since they are accessible and can be used in millions of different contexts. After those, the major and minor pentatonic scales are a great choice. Then, depending on what kind of music you want to play, some scales might be more worth your time than others.
How do I know if a scale is major or minor?
Generally, the note that defines whether a scale is major or minor is the 3rd. Major scales have a major third (2 whole tones from the root) and minor scales have a minor 3rd (1,5 whole tones from the root). For instance, the C Major scale has an E natural (major third from C) and the C minor scale has an E flat (minor third from C).
How do I know what scales I can use on a chord progression?
Your first step should always be figuring out the key of the song. You can do this by looking at the key signature on the staff, if you have the sheet music. The sharps or flats there will indicate what key you’re in. Check the Circle of Fifths if you need to double check how many accidentals each key has.
Then, you can use the notes of the corresponding major or minor scale to compose melodies on top of that harmony, and improvise. This is a very simple approach meant for beginner players. As you deepen your understanding of harmony, you will be able to use a wider variety of scales throughout a song.
Most Frequently Used Scales – Overview and Guitar Patterns
If you’re a beginner, it would be wise to start by learning the scales listed in this section. They cover a lot of ground and allow you to understand other concepts later on.
Major Scale or Ionian Mode
The first scale of most players. The major scale is defined by its “formula” or the distance between each of its notes/scale degrees.
It can be described numerically as “1, 2, 3, 4, 5, 6, 7”, or by “W – W – H – W – W – W – H”, which represent “whole tone” and “half tone”.
In the key of C, its notes are: C, D, E, F, G, A, B.
It can also be called “Ionian Mode”, since the notes are the same for both.
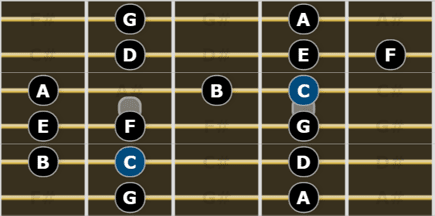
Here are the two most commonly used shapes on the guitar. There are more, but you should start by getting acquainted with these two since they have the root note on the 6th and 5th strings, which makes it easier for you to find them quickly while playing.
Note: these examples are in the key of C, but the key isn’t what matters – by shifting this shape throughout the neck, you can play any major scale, as long as you can find its root on the 5th or 6th string.
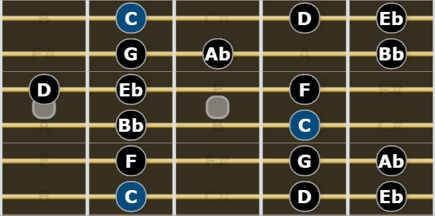
Natural Minor Scale or Aeolian Mode
The natural minor scale (also called Aeolian Mode) can be represented numerically as “1, 2, b3, 4, 5, b6, b7”.
In the key of C, this corresponds to the following notes: C, D, Eb, F, G, Ab, Bb.
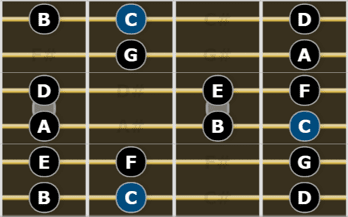
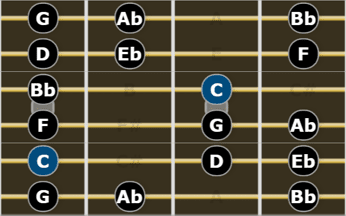
Below, you’ll find the shapes that you should start by memorizing, since the root is located on the 5th and 6th strings, making it easier to locate these patterns on the neck while you’re playing.
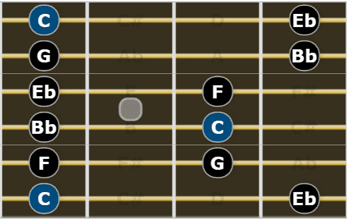
Minor Pentatonic Scale
The minor pentatonic scale is one of the favorite scales for most guitarists. Its patterns are easy to play, and it sounds good over a large number of chords.
It is a 5 note scale based on the natural minor scale. Remove the 2nd and 6th degrees of the natural minor, and you’ve got it.
This means its formula is “1, b3, 4, 5, b7”. In C, this gives us the notes “C, Eb, F, G, Bb”.
Check below for the two most common scale shapes – these two are a must know for every guitarist.
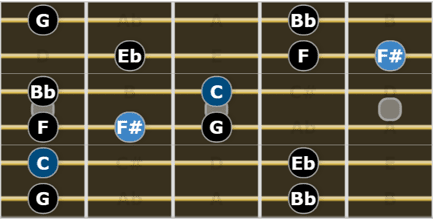
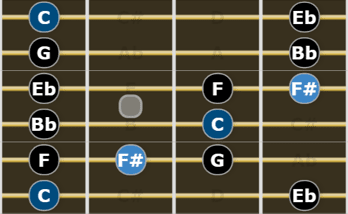
Minor Blues Scale
The minor blues scale is another staple of most guitarist’s arsenals. It is essentially the same as the minor pentatonic, but with an added note, called “blue note”. It is the #4 of the scale.
This translates to the formula “1, b3, 4, #4, 5, b7”, which in C corresponds to the notes “C, Eb, F, F#, G, Bb”.
In the diagrams below, you’ll see the blue note (F#) in a different color. This is the note you must play if you want to get the bluesy character from the scale.
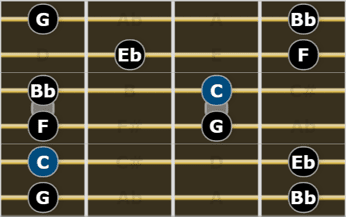
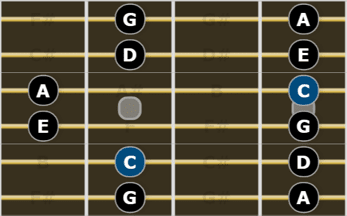
Major Pentatonic Scale
The major pentatonic scale uses the same concept as the minor pentatonic. In this case, it removes the 4th and 7th degrees from the major scale.
This gives us the following formula: “1, 2, 3, 5, 6”. In C, this corresponds to the notes “C, D, E, G, A”.
Removing the two notes that form a tritone interval gives this scale a more open sound that works great in many different scenarios.
Here are the two most common shapes of this scale on the guitar:

Scale Terminology: What do their names mean?
As you start exploring scales deeper and deeper, you will notice that their names usually describe one of their defining aspects.
This section is meant to give you an introduction to some of the most important terms you should know, which will allow you to infer what some scales look and sound like just by reading their name.
Major
Usually refers to a major third interval between the root and the third degree. The most common example is the major scale itself, but there are other instances where this knowledge is useful (for instance, in “major minor chords”).
Minor
Generally refers to a minor third interval between the root and the third degree. This can be observed in every minor scale (natural minor, melodic minor, etc.).
Augmented
In a chord/scale context, “augmented” refers to a note that is sharpened, usually a fifth. For instance, an augmented chord has its 5th raised by a semitone. The augmented scale has an augmented second (#2) and an augmented fifth (#5).
Diminished
Simply put, it is the opposite of augmented. Diminished chords have a diminished fifth (one semitone lower than a perfect fifth).
Dominant
In harmony, “dominant” implies a seventh chord containing a root, major third, perfect fifth and a minor seventh. These are usually the fifth (V) degree of a key center. In a scale context, it means that you will find at least a minor seventh in it.
Chromatic
This term means that a scale moves one semitone at a time. The chromatic scale includes every note there is between its root and its octave.
Pentatonic
The word “pentatonic” tells us that a scale has 5 notes, instead of the usual 7. However, some scales have more than 7 notes.
Whole-tone
In a way, it is the opposite of “chromatic” when applied to the best-known scales associated with these concepts. The whole-tone scale always moves in whole tones, there aren’t any notes separated by a semitone.
Auxiliary
The concept of “auxiliary” in a scale context refers to a relative scale. For instance, C Major and A minor are relative scales. It can also be used as an alternative name for some scales (some people refer to the half-whole diminished scale as the auxiliary diminished blues scale).
Symmetrical
Scales that divide an octave in two equal parts. Some of the examples you can find are the whole-tone scale, augmented scale and diminished scales.
Modes
You will inevitably come across modes as you study music, especially if you get into jazz. In summary, they are scales that are obtained by starting to read on a note which isn’t the root note.
It is easier to understand with a practical example:
If you take the C Major scale, but read it from D to D instead of C to C, you obtain the D Dorian mode. If you read it from E to E, you will obtain the E Phrygian mode.
The modes that musicians generally stumble upon first are the “Greek modes”: Ionian, Dorian, Phrygian, Lydian, Mixolydian, Aeolian and Locrian.
More Frequently Found Scales you should know
The scales listed in this section should be your priority after you are comfortable enough with the most common scales to compose melodies and improvise over simple chord changes.
Greek Modes:
You can check out the modes after you’re comfortable with the scales that were discussed previously.
You get the following modes from the C Major Scale:
| Mode Name | Scale Formula | Example in C |
| C Ionian (same as major scale) | 1 2 3 4 5 6 7 | C D E F G A B |
| D Dorian | 1 2 b3 4 5 6 b7 | D E F G A B C |
| E Phrygian | 1 b2 b3 4 5 b6 b7 | E F G A B C D |
| F Lydian | 1 2 3 #4 5 6 7 | F G A B C D E |
| G Mixolydian | 1 2 3 4 5 6 b7 | G A B C D E F |
| A Aeolian(same as natural minor scale) | 1 2 b3 4 5 b6 b7 | A B C D E F G |
| B Locrian | 1 b2 b3 4 b5 b6 b7 | B C D E F G A |
Notice how every mode that comes from the C Major scale uses the same notes, only starting from a different root note.
Harmonic Minor
You can think of the harmonic minor scale as a natural minor scale with a raised seventh.
Its formula is “1, 2, b3, 4, 5, b6, 7”.
The interval between its 6th and 7th degrees is what gives it such a characteristic sound.
Melodic Minor
The melodic minor scale has the following formula “1, 2, b3, 4, 5, 6, 7”.
You can think of it as a major scale with a minor third, but don’t use it over major chords.
Major Blues
This scale follows the same principle as the minor blues scale discussed previously, but with a major scale.
Take the major pentatonic scale and add a flat third between the second and third scale degrees, which gives you the following formula “1, 2, b3, 3, 5, 6”.
Diminished Half-Whole
This is a symmetrical scale that some people call “dominant diminished scale”, because it is frequently used to improvise over 7b9 chords (for example, playing A diminished half-whole over an A7b9 chords).
Its formula is “1, b9, #9, 3, #11, 5, 13, b7”. To represent it, we use tensions such as 9, 11 and 13 instead of 2, 4 and 6.
Diminished Whole-Half
This scale uses the same concept as the previous one, but it starts with a whole step instead of a half step. Therefore, its formula is “1, 9, b3, 11, b5, #5, 13, 7”.
It is typically heard over diminished 7 chords (for instance, playing E diminished whole-half over an Edim7 chord).
Altered
The altered scale is the seventh mode of the minor melodic scale. It is frequently found in a jazz improvisation context, since it has an “outside” sound that many players like to use.
Its formula is “1, b9, #9, 3, b5, b13, b7”. It is generally played over altered chords.
Some people also refer to this scale as “Super Locrian”.
Less Common Scales Worth Learning
The scales listed in this section are not heard as frequently as the ones that were discussed before (major, natural minor, major/minor pentatonic and blues), but they’re still worth investigating.
Harmonic Minor Scale Modes
The concept of “modes” seen before can also be applied to other scales, such as the harmonic minor. Doing so gives us the following modes:
| Mode Name | Scale Formula | Example in C |
| C Harmonic Minor | 1 2 b3 4 5 b6 7 | C D Eb F G Ab B |
| D Locrian Natural 6 | 1 b2 b3 4 b5 6 b7 | D Eb F G Ab B C |
| Eb Ionian #5 | 1 2 3 4 #5 6 7 | Eb F G Ab B C D |
| F Dorian #11/Dorian #4 | 1 2 b3 #4 5 6 b7 | F G Ab B C D Eb |
| G Phrygian Dominant/Mixolydian b9b13 | 1 b2 3 4 5 b6 b7 | G Ab B C D Eb F |
| Ab Lydian #2 | 1 #2 3 #4 5 6 7 | Ab B C D Eb F G |
| B Super Locrian bb7/Ultra Locrian | 1, b9, b3, b4, b5, b6, bb7 | B C D Eb F G Ab |
Melodic Minor Scale Modes
Applying the same concept to the melodic minor scale gives us the following modes:
| Mode Name | Scale Formula | Example in C |
| C Melodic Minor | 1 2 b3 4 5 6 7 | C D Eb F G A B |
| D Dorian b9/Phrygian #13 | 1 b2 b3 4 5 6 b7 | D Eb F G A B C |
| Eb Lydian Augmented | 1 2 3 #4 #5 6 7 | Eb F G A B C D |
| F Lydian Dominant/Lydian b7 | 1 2 3 #4 5 6 b7 | F G A B C D Eb |
| G Mixolydian b13/Aeolian Dominant | 1 2 3 4 5 b6 b7 | G A B C D Eb F |
| A Aeolian b5/Locrian #2 | 1 2 b3 4 b5 b6 b7 | A B C D Eb F G |
| B Super Locrian/Altered Scale | 1, b9, #9, 3, b5, b13, b7 | B C D Eb F G A |
Additional Less Common Scales to Learn
Here are a few more scales that don’t come up as often as the ones discussed at the beginning of this guide.
| Scale Name | Scale Formula |
| Diminished Whole Tone | 1 b9 #9 3 b5 b6 b7 |
| Augmented | 1, #2, 3, #4, #5, 7 |
| Auxiliary Augmented | 1, 2, 3, #4, #5, #6 |
| Auxiliary Diminished | 1, 2, b3, 4, #4, #5, 6, 7 |
| Auxiliary Diminished Blues | 1, b2, b3, 3, b5, 5, 6, b7 |
| Bebop Dominant | 1, 2, 3, 4, 5, 6, b7, 7 |
| Bebop Half Diminished | 1, b2, b3, 4, b5, 5, b6, 7 |
| Bebop Major | 1, 2, 3, 4, 5, #5, 6, 7 |
| Bebop Minor | 1, 2, b3, 3, 4, 5, 6, b7 |
| Chromatic | 1, b2, 2, b3, 3, 4, b5, 5, #5, 6, b7, 7 |
| Dominant Pentatonic | 1, 2, 3, 5, b7 |
| Double Harmonic | 1, b2, 3, 4, 5, b6, 7 |
| Enigmatic | 1, b2, 3, #4, #5, #6, 7 |
| Half Diminished | 1, b2, b3, 4, b5, b6, b7 |
| Half Diminished (Variant) | 1, 2, b3, 4, b5, b6, b7 |
| Leading Whole Tone | 1, 2, 3, #4, #5, #6, 7 |
| Major Locrian | 1, 2, 3, 4, b5, b6, b7 |
| Mixo-Blues | 1, b3, 3, 4, b5, 5, b7 |
| Nine Tone | 1, 2, #2, 3, #4, 5, #5, 6, 7 |
| Octatonic (H/W) | 1, b2, b3, 3, b5, 5, 6, b7 |
| Octatonic (W/H) | 1, 2, b3, 4, b5, b6, 6, 7 |
| Overtone | 1, 2, 3, #4, 5, 6, b7 |
| Phrygian Major | 1, b2, 3, 4, 5, b6, b7 |
| Six Tone Symmetrical | 1, b2, 3, 4, #5, 6 |
| Whole Tone | 1, 2, 3, #4, #5, b7 |
| Pentatonic Neutral | 1, 2, 4, 5, b7 |
| Lydian Minor | 1, 2, 3, #4, 5, b6, b7 |
| Lydian Diminished | 1, 2, b3, #4, 5, 6, 7 |
| Blues (Variation #1) | 1, b3, 4, b5, 5, b7, 7 |
| Blues (Variation #2) | 1, b3, 3, 4, b5, 5, b7, 7 |
| Blues (Variation #3) | 1, b3, 3, 4, b5, 5, 6, b7, 7 |
| Pentatonic Blues | 1, b3, 4, b5, 5, b7 |
Exotic Scales: Examples of Scales Found in Specific Contexts
Some scales are generally associated with the music of a specific country, culture or genre, and using them can get you very close to the overall sound of that context.
Here are some examples of this type of scale:
| Scale Name | Scale Formula |
| Algerian | 1, 2, b3, 4, #4, 5, b6, 7 |
| Arabian #1 | 1, 2, b3, 4, #4, #5, 6, 7 |
| Arabian #2 | 1, 2, 3, 4, #4, #5, b7 |
| Balinese | 1, b2, b3, 5, b6 |
| Byzantine | 1, b2, 3, 4, 5, b6, 7 |
| Chinese | 1, 3, #4, 5, 7 |
| Chinese #2 | 1, 2, 4, 5, 6 |
| Chinese Mongolian | 1, 2, 3, 5, 6 |
| Egyptian | 1, 2, 4, 5, b7 |
| Eight Tone Spanish | 1, b2, #2, 3, 4, b5, b6, b7 |
| Ethiopian (A Raray) | 1, 2, 3, 4, 5, 6, 7 |
| Ethiopian (Geez & Ezel) | 1, 2, b3, 4, 5, b6, b7 |
| Hawaiian | 1, 2, b3, 4, 5, 6, 7 |
| Hindu/Hindustan | 1, 2, 3, 4, 5, b6, b7 |
| Hirajoshi | 1, 2, b3, 5, b6 |
| Hirajoshi #2 | 1, 3, 4, 6, 7 |
| Hungarian Gypsy | 1, 2, b3, #4, 5, b6, 7 |
| Hungarian Gypsy Persian | 1, b2, 3, 4, 5, b6, 7 |
| Hungarian Major | 1, #2, 3, #4, 5, 6, b7 |
| Hungarian Minor | 1, 2, b3, #4, 5, b6, 7 |
| Japanese #1 | 1, b2, 4, 5, b6 |
| Japanese #2 | 1, 2, 4, 5, b6 |
| Japanese (Ichikosucho) | 1, 2, 3, 4, #4, 5, 6, 7 |
| Japanese (In Sen) | 1, b2, 4, 5, b7 |
| Japanese (Taishikicho) | 1, 2, 3, 4, #4, 5, 6, #6, 7 |
| Javaneese | 1, b2, b3, 4, 5, 6, b7 |
| Jewish (Adonai Malakh) | 1, b2, 2, b3, 4, 5, 6, b7 |
| Jewish (Ahaba Rabba) | 1, b2, 3, 4, 5, b6, b7 |
| Jewish (Magen Abot) | 1, b2, #2, 3, #4, #5, #6, 7 |
| Kumoi | 1, 2, b3, 5, 6 |
| Kumoi #2 | 1, b2, 4, 5, b6 |
| Iwato | 1, b2, 4, b5, b7 |
| Mohammedan | 1, 2, b3, 4, 5, b6, 7 |
| Moorish Phrygian | 1, b2, b3, 3, 4, 5, #5, b7, 7 |
| Neopolitan Major | 1, b2, b3, 4, 5, 6, 7 |
| Neopolitan Minor | 1, b2, b3, 4, 5, b6, b7 |
| Oriental #1 | 1, b2, 3, 4, b5, b6, b7 |
| Oriental #2 | 1, b2, 3, 4, b5, 6, b7 |
| Pelog | 1, b2, b3, 5, b6 |
| Pelog #2 | 1, b2, b3, 5, b7 |
| Persian | 1, b2, 3, 4, b5, b6, 7 |
| Prometheus | 1, 2, 3, b5, 6, b7 |
| Prometheus Neopolitan | 1, b2, 3, b5, 6, b7 |
| Romanian Minor | 1, 2, b3, #4, 5, 6, b7 |
| Spanish Gypsy | 1, b2, 3, 4, 5, b6, b7 |
How to Learn and Practice Scales
Practicing scales should be done methodically. You should start by knowing the scale’s formula, or its intervals.
Then, find those notes and their patterns throughout the fretboard.
Practice each pattern slowly with a metronome to build muscle memory of each one individually. Increase the speed gradually as you stop making mistakes.
Finally, you should work on connecting those patterns, and trying to apply them in a musical scenario, such as writing a melody or improvising a solo. Be patient and focus on making progress slowly.
Glossary of Scale Terms
Here are a few terms and concepts that you are expected to understand as a musician capable of using scales as a useful resource:
- Whole Tone: same as a full step, it is the same as 2 half tones/semitones.
- Half Tone: same as a half step, or one semitone.
- Scale Degree: synonym of a note within a scale.
- Interval: distance between two notes, it can be melodic or harmonic.
- Octave: the interval or distance between a note (for example C) and the next C that exists above or below it.
- Chord: several notes (3 or more) played simultaneously, its type varies depending on the intervals it contains.
- Accidentals: sharps or flats of a certain key. Sharps (#) raise the pitch by a semitone and flats (♭) lower it by a semitone.
- Natural: when a note is not sharp or flat.
Fret Number/Interval Quality Relationship on the Guitar
The guitar is a very visual instrument, and you can use this in your favor.
You can quickly figure out the interval between two frets by memorizing how many semitones are in that interval. Remember, each fret equals one semitone.
Here’s a table that illustrates this relationship:
| Number of Frets / Semitones | Interval |
| 1 | Minor 2nd |
| 2 | Major 2nd |
| 3 | Minor 3rd |
| 4 | Major 3rd |
| 5 | Perfect 4th |
| 6 | Aug 4th / Dim 5th |
| 7 | Perfect 5th |
| 8 | Minor 6th |
| 9 | Major 6th |
| 10 | Minor 7th |
| 11 | Major 7th |
| 12 | Octave |
Final Thoughts on Scales for Guitarists
By now you have surely realized that there are enough scales to keep you entertained for long years to come. However, you should also be able to filter out the ones that interest you the most.
Being able to use your resources tastefully is a valuable skill you can develop by studying scales and how to apply them in your playing.