The acoustic guitar is a wonderfully versatile instrument, allowing you to play almost any kind of song you can imagine. Rock songs are easily played on acoustic, difficult fingerpicking pieces can be reworked to easy chords. Nothing is out of reach for the acoustic guitar!
It’s this very thing that makes it such a great choice for beginners. The sheer volume of songs available for you to learn is incredible and they can cater to all skill levels.
Which is why today, we’ve gathered up 60 great, fun, and easy to play acoustic guitar songs that any beginner can try their hand at!
Contents
- Stand By Me by Ben E. King
- Knockin’ on Heaven’s Door by Bob Dylan
- I’m Yours by Jason Mraz
- Fallin’ by Alicia Keys
- Free Fallin’ by Tom Petty
- Leaving on a Jet Plane by John Denver
- Love Me Do by The Beatles
- More Than Words by Extreme
- Moves Like Jagger by Maroon 5
- Ring of Fire by Johnny Cash
- Three Little Birds by Bob Marley
- What’s Up by 4 Non Blondes
- Bad Moon Rising by Creedence Clearwater Revival
- Born in the USA by Bruce Springsteen
- Bye, Bye Love by The Everly Brothers
- Eleanor Rigby by The Beatles
- Give Peace a Chance – John Lennon
- Glory Days by Bruce Springsteen
- Have You Ever Seen the Rain? – Creedence Clearwater Revival
- A Horse With No Name by America
- Hound Dog by Elvis Presley
- I Walk the Line by Johnny Cash
- Just the Way You Are by Bruno Mars
- Marry You by Bruno Mars
- No Rain by Blind Melon
- She Will Be Loved by Maroon 5
- Stuck in the Middle With You by Stealers Wheel
- Wonderwall by Oasis
- Brown Eyed Girl by Van Morrison
- Can’t You See – Marshall Tucker Band
- Chasing Cars by Snow Patrol
- Drive by Incubus
- Songbird by Oasis
- A Horse With No Name by America
- A Long December by Counting Crows
- Ain’t No Sunshine by Bill Withers
- All Summer Long by Kid Rock
- American Pie by Don McLean
- Back to December by Taylor Swift
- Before You Accuse Me by Eric Clapton
- Big Me by Foo Fighters
- Blackbird by The Beatles
- Blowin’ in the Wind by Bob Dylan
- Blowin’ Smoke by Kacey Musgraves
- Bottoms Up by Brantley Gilbert
- Boulevard of Broken Dreams by Green Day
- Boys ‘Round Here By Blake Shelton
- Breakfast at Tiffany’s by Deep Blue Something
- Daughters by John Mayer
- Don’t Think Twice It’s Alright by Bob Dylan
- Every Rose Has Its Thorn by Poison
- Fast Car by Tracy Chapman
- Hallelujah by Jeff Buckley
- Perfect by Ed Sheeran
- Hey There Delilah by Plane White T’s
- Mad World by Gary Jules
- Sweet Caroline by Neil Diamond
- Yesterday by The Beatles
- Heart of Gold by Neil Young
- Used to Love Her by Guns N’ Roses
Stand By Me by Ben E. King
Click Here for tab for Stand By Me by Ben E. King
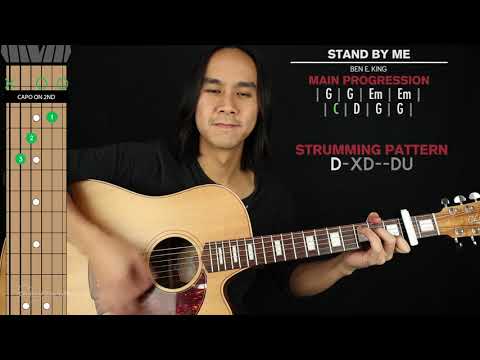
This was originally recorded in 1961 as part of Ben’s Don’t Play That Song! album, but there’s a good chance you have heard it in one of its other incarnations, as it’s been covered over 400 times by all manner of artists, from John Lennon to Tracy Chapman. Because of the royalties that are paid out through these covers, it’s estimated the song has been able to garner almost $23 million USD purely from royalties. Incredible!
For this song, you’ll need a capo on the second fret of the guitar. You’ll just be playing four simple chords which are: G, Em, C, and D. The strumming pattern is quite unique and you’ll be required to use some ‘percussive muting’ which is where you will use your left hand to mute the strings while your right hand strikes down creating that percussive sound.
Knockin’ on Heaven’s Door by Bob Dylan

Click Here for tab for Knockin’ on Heaven’s Door by Bob Dylan
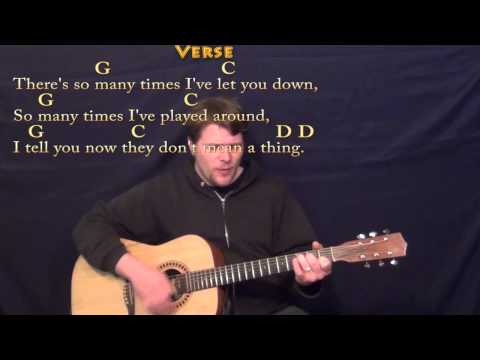
From the soundtrack to the 1973 movie Pat Garrett and Billy the Kid. Much like Stand by Me, this has also been covered a great number of times and by some very prolific artists, including Eric Clapton and Guns N’ Roses. It was released as a single two months after the movie and ended up becoming one of Dylan’s most popular songs.
The song has beautiful guitar parts that tread the line between being easy to play while still sounding fantastic. They use a mixture of single string picking and strumming patterns, but at a nice and slow 68 bpm so is still very easily playable.
I’m Yours by Jason Mraz

Click Here for tab for I’m Yours by Jason Mraz
Even though the song was released in demo form as part of an EP, it would later be re-released as a fully-produced track in 2008 for his album, We Sing. We Dance. We Steal Things. It went on to become one of his biggest sources of exposure and success. With its catchy vocal hooks and infectious, upbeat guitar parts, everybody fell in love with this song.
The challenge in performing it comes from both singing and playing at the same time. But the guitar part itself is nothing too challenging, with just some easy 2- and 4-string barre chords. You’ll be playing large parts of the song using triplets, so try to listen to the song carefully so you can get a feel for the rhythm.
Fallin’ by Alicia Keys

Click Here for tab for Fallin’ by Alicia Keys
Going right back to the start of Alicia Keys’ career with her debut album Songs in A Minor. Which uniquely was both written and produced herself. She came out with a big bang, charting in numerous countries and winning a whopping three Grammy Awards in 2002. Needless to say, this is the quintessential song to learn if you are interested in Alicia’s music.
You’ll need a capo on the second fret of the guitar, but don’t worry if you don’t have one on hand. Both the tab and video lesson offer alternatives to play this without one. Outside of that, it’s just played using a light strumming pattern and is essentially all easy open chords and shouldn’t pose much challenge regardless of your skill level.
Free Fallin’ by Tom Petty

Click Here for tab for Free Fallin’ by Tom Petty
A wonderfully melodic song that sees Tom recollect his time driving along Ventura Boulevard and all the crazy things he saw. It’s an absolute classic and one of his most famous tracks. Its popularity allowed him to perform the track live on the MTV Music Awards with Guns N’ Roses singer Axl Rose. It’s also been used on a plethora of movies and TV shows including The Sopranos. Its versatility is due to its almost upbeat melody matched with melancholic lyrics.
Although at first glance it might seem like the song will be using fairly easy-to-play chords in comfortable positions, this song does have some quite fast chordal movement that requires you to lift your hand and change chords quickly.
Leaving on a Jet Plane by John Denver
Click Here for tab for Leaving on a Jet Plane by John Denver
A great one to learn if you’re looking for something a bit more on the sad side. This song was written about the lonely feelings John would experience when he would frequently have to travel away from his loved ones for extended periods. Needless to say, the song resonated with people massively and he re-recorded the song for release on his album Rhymes & Reasons.
The song starts off with some easy arpeggiated chords, which are chords that are played 1 note at a time instead of strummed. Then it moves onto a strumming section, which requires you to target specific strings, albeit loosely, as you strum. Take a look at the tab and you’ll see the G and B strings are targeted on the downstrokes.
Love Me Do by The Beatles

Click Here for tab for Love Me Do by The Beatles
Of course, pretty much every Beatles song is appropriate for a list of guitar songs for beginners, but Love Me Do in particular is the perfect example of a simple tune you can learn in just a few minutes. It hit the number 1 spot in the US, going platinum with over 1 million copies sold. Rather hilariously, the song was written by Paul McCartney when he was only 16, during a day when he skipped school and stayed home. Over the years, it’s been covered in just about every genre and on every instrument, even ukulele!
This song is perfect for beginners, even as your very first song. It uses only 3 chords which are D, A, and E that are played in a simple strumming pattern. So if you only have a little time to practice, this is the one to learn!
More Than Words by Extreme

Click Here for tab for More Than Words by Extreme
Rather unlike their usual style, and much more of a ballad-esque effort from their 1990 album Pornograffitti. The song describes a person who wants their partner to do more than simply say ‘I love you’ to prove they love them, as the term is often so overused it becomes meaningless.
For this song you’ll need to tune your guitar down by 1 semitone on every string, which is easily doable and won’t cause any problems with string tension. This is a great workout and beginner rhythmic exercise as the strumming pattern requires you to deaden some notes with different intensities.
Moves Like Jagger by Maroon 5
Click Here for tab forMoves Like Jagger by Maroon 5
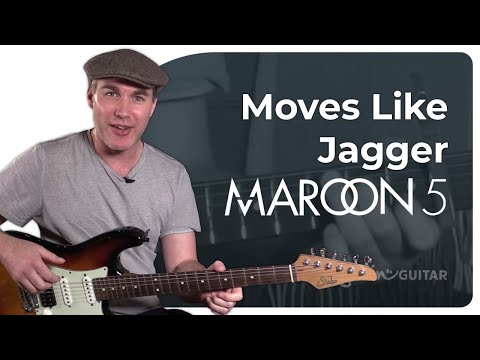
Featuring the wonderful Christina Aguilera as a guest vocalist, this song was on Maroon 5’s fourth album titled Hands All Over. It’s one of the best-selling singles of all time, selling over 7 million copies and was even certified Diamond. Despite the critical reception being mixed, the general public decided unanimously that it was a great song.
So how does this work out on guitar? Well, fortunately, if you’re a beginner who’s never tried your hand at some funk-style playing before, this is your chance! It’s originally played on an electric guitar, but is very frequently played acoustically by the band and works great!
Ring of Fire by Johnny Cash

Click Here for tab for Ring of Fire by Johnny Cash
A classic tune you’ve no doubt heard dozens of times already. The song was a huge commercial success and ended up being one of his best-selling songs. The writing credits originally went to June Carter and Merle Kilgore, but Vivian Cash (Johnny’s wife) revealed that he wrote it for June as she needed the money.
This easy guitar song can be played a few different ways. As detailed in the tab, it can be played with just open strummed chords which are perhaps easier for the beginner. But the video lesson also details a version that outlines the song’s primary melody a little clearer. They are both super easy to play, so pick whichever one you like!
Three Little Birds by Bob Marley

Click Here for tab for Three Little Birds by Bob Marley
A great song to learn if you’re looking for that quintessential Bob Marley-style reggae sound. The song’s meaning is a little disputed, but it’s known that Bob used to refer to his three backup singers as his Three Little Birds, so it seems likely that’s where it came from. This was a popular song for Bob, making its way into the top 20 on the UK charts.
While the single chord progression is what makes this one of the more popular guitar songs for beginners, it has a little bit of an unusual rhythm that may be a challenge for you if you’re a beginner who hasn’t been exposed to reggae before. But essentially you can pretend to do a downstroke on the rests, but don’t actually strike the notes, and then play the chord with an upstroke on the offbeat. This can make handling the rhythm much easier.
What’s Up by 4 Non Blondes

Click Here for tab for What’s Up by 4 Non Blondes
4 Non Blondes only released a single studio album, but it did incredibly well, selling over 1.5 million copies in the two years following its release. What’s Up is the second single from this album, which garnered them a fair bit of commercial exposure. Oddly enough, songwriter Linda Perry has mentioned that she hated the production and mix on the final version of the song.
The song is high-energy and you will be strumming chords pretty much nonstop, so it’s sure to give your right arm a good workout! Likewise for your left, you’ll be playing some fairly big barre chords that you’ll need to hold down for some time. Treat this song as a small dexterity workout!
Bad Moon Rising by Creedence Clearwater Revival

Click Here for tab for Bad Moon Rising by Creedence Clearwater Revival
This was released as the first song from the Green River album and was put out four months before the album’s full release. It gained a lot of traction and exposure, setting the album up for greatness. It hit the number 2 spot on the Billboard Hot 100 and number 1 on the UK Singles Chart. It’s also been used in a lot of popular media including the movie An American Werewolf in London and even the popular FromSoftware video game Sekiro: Shadows Die Twice.
This is another example of how as you strum, you will need to target certain groups of strings on either your down or your upstroke. Focus on getting your strumming pattern correct first and you will find you naturally begin to hit the right groups of strings.
Born in the USA by Bruce Springsteen

Click Here for tab for Born in the USA by Bruce Springsteen
Another of those classic acoustic guitar songs that any beginner can try their hand at. Taken from the album of the same name which was ranked in Rolling Stone’s Top 500 Albums of All Time. The song addresses the unfair treatment of US military veterans upon their return from service.
There are a few different ways to play this song, but for acoustic, we recommend just outlining the chords. If you have a capo available, you can use it on the second fret which will save some energy, so you don’t have to hold the big barre chords.
Bye, Bye Love by The Everly Brothers

Click Here for tab for Bye, Bye Love by The Everly Brothers
You may well have first heard this song when it was covered by The Beatles in 1969, but originally it was recorded and released in 1957 as a single. Oddly enough, the song didn’t originally have any guitar in it at all! But Don Everly came up with some guitar parts, which they used for the final song. In addition to the well-known Beatles rendition, the song has also been covered by notable artists such as George Harrison and Simon & Garfunkel.
The song moves at a fair pace, requiring you to change chords quite fast, but is something you will become accustomed to very quickly. Fortunately, the song primarily just uses the E, A, and D chords so it’s a good opportunity to become intimately familiar with them if you aren’t already.
Eleanor Rigby by The Beatles

Click Here for tab for Eleanor Rigby by The Beatles
Always appropriate for beginners, The Beatles are here again with a single from their album Revolver. The original melody for the song was written by Paul McCartney on piano which was then transferred to the guitar. The song was named in reference to Eleanor Bron, who acted in the Beatles movie Help, with the ‘Rigby’ part being taken from a store in Bristol, England.
This song was partway through The Beatles’ transition from a primarily pop/rock-oriented group to one that dabbled more in experimental music. You’ll be jumping quite a bit between playing single note and strummed minor and major chords, making it serve as great practice for a few different techniques!
Give Peace a Chance – John Lennon

Click Here for tab for Give Peace a Chance – John Lennon
In fitting with the time, this is an anti-war song and was the first song released by John Lennon as a solo single, although he was still part of The Beatles at the time. When this song was written, John was doing something called a ‘bed-in’, which is a kind of political protest. When asked why he was doing it, he would simply reply, “Give Peace a Chance.”
Once again heading into even easier territory than the three-chord songs, this time you’ll just need only 2 chords, D and A! You’ll also have a very simple strumming pattern to learn, which is used for the entirety of the song. This easy tune could be someone’s very first song they learn on guitar.
Glory Days by Bruce Springsteen

Click Here for tab for Glory Days by Bruce Springsteen
Heading to the ’80s once again, for Bruce’s 1985 album Born in the U.S.A. This song follows a protagonist who is reminiscing about his life and journey through things like high school, which he recollects as being his ‘glory days’. While not a massive commercial success for Bruce, it did manage to chart in the top 10 on the US Billboard Hot 100, going on to become one of his stable of classic rock songs.
This song contains both electric and acoustic guitar parts, with the acoustic being left out of the intro and only coming back in the first verse. However feel free to play any and all electronic guitar parts you wish on the acoustic, they sound great!
Have You Ever Seen the Rain? – Creedence Clearwater Revival

Click Here for tab for Have You Ever Seen the Rain? – Creedence Clearwater Revival
This song was written by John Fogarty and released in 1971 as a promotional single for his album Pendulum. There has been much speculation over the lyrical meaning of the song, with some believing the use of the word rain is actually referring to falling bombs. The song was a commercial success and hit the number 1 spot in Canada and the number 3 spot in the UK.
This one, while sitting in the easy spectrum, does require quite a bit more memorizing to play fully, as there is a unique chord progression for the intro, verse, and chorus. Fortunately, the strumming pattern is a bit more consistent throughout!
A Horse With No Name by America

Click Here for tab for A Horse With No Name by America
America started to achieve great recognition from their very first single, A Horse With No Name, from their self-titled debut album. While initially released in Europe to moderate success, once it was released in the United States it went on to become their biggest single and one of those classic acoustic guitar songs for beginners. The single was also part of the original soundtrack for the movie which was also titled, A Horse with No Name.
This song has a huge, lush, and open feel to it, so it’s extra important to make sure every note of the chords that you hold rings out loudly and proudly, with nothing being choked out.
Hound Dog by Elvis Presley

Click Here for tab for Hound Dog by Elvis Presley
There’s a very high chance you are already familiar with this one. Originally recorded as a 12-bar blues piece by Jerry Leiber and Mike Stroller, by far its most popular incarnation came from the rock legend, Elvis Presley. Elvis is hugely responsible for popularizing the song, which is considered a classic among acoustic guitar songs and must-learn for aspiring guitarist.
As mentioned, this is essentially a 12-bar blues song that you can play using the chords A, D, and E. There are, of course, versions played on the electric guitar but this is very easily and commonly played on acoustic just using open chords.
I Walk the Line by Johnny Cash
Click Here for tab for I Walk the Line by Johnny Cash
A hugely successful song for Johnny, taken from the album Johnny Cash With His Hot and Blue Guitar! It charted at the number 1 spot on the US Billboard and hung in there for 43 weeks before finally dropping off the charts. It sold over two million copies. The song was written while Johnny was stationed in Germany as part of the United States Air Force.
This song has a very distinct melody being played on the lower strings of the guitar, which is then accented by rhythmic chords on the upper strings. They come together to create an ensemble that acts as a complete musical piece. This can be challenging to get sounding smooth at first, but is something a beginner can master with just a little practice!
Just the Way You Are by Bruno Mars

Click Here for tab for Just the Way You Are by Bruno Mars
This was Bruno Mars’ first-ever solo endeavor, the first single from his debut album Doo-Wops & Hooligans. While critics were quite harsh on the song, claiming the lyrics were too cheesy, fans nevertheless loved it and it would end up winning the award for Best Male Pop Vocal Performance at the 53rd Grammy Awards. It was also the best-selling digital single of 2011 with an incredible 12.5 million sales.
This song will become much easier to play if you have a capo available, which can be placed on the second fret, allowing you to use the open chord voicings. It’s also made easier by the fact there is just a single chord progression used throughout the song which is D, Bm7, G, and D.
Marry You by Bruno Mars

Click Here for tab for Marry You by Bruno Mars
Another killer song from Bruno’s Doo-Wops & Hooligans, which was written by the production group The Smeezingtons, of which Bruno himself is a member. The song carries a theme of ‘spontaneous marriage’ and many people have used it as a proposal song for their prospective wives. While the song was never released as a single, it still managed to make its way into the UK charts, even reaching the number 11 spot.
This is another song where your life is going to be much easier if you can get a hold of a capo and use it on the third fret. But if not, it is still playable using just the open chords. The whole song uses the 3 chord progression of D, Em, and G.
No Rain by Blind Melon

Click Here for tab for No Rain by Blind Melon
This is a single from Blind Melon’s self-titled debut album. The song achieved much of its success and exposure because of its music video, which MTV gave a great deal of playtime. This was pivotal in the single’s success and allowed them to go multi-platinum and even reach number 20 on the US Billboard Hot 100 chart.
This song contains a mixture of acoustic and electronic parts, but just like the other songs on the list, feel free to just play everything on the acoustic, because it all sounds good! The song has a fairly fast and upbeat feel at 150bpm, there are also a lot of groovy mutes which make it lots of fun to jam to!
She Will Be Loved by Maroon 5

Click Here for tab for She Will Be Loved by Maroon 5
Written by singer Adam Levine and guitarist James Valentine, this is a single from Maroon 5’s album titled Songs About Jane. It’s fairly standard for what you might expect from Maroon 5, a catchy and accessible song that translates great to the acoustic guitar. It’s very much in line with their other singles.
For this track, you’ll be using quite a lot of ‘staccato’ playing, which is to say you will mute notes quite quickly after plucking them to give it that percussive feel. This can feel a little unusual at first, but if you practice laying the palm/side of your right hand across the strings to immediately cut the sound, it’ll start to feel comfortable very quickly.
Stuck in the Middle With You by Stealers Wheel

Click Here for tab for Stuck in the Middle With You by Stealers Wheel
A catchy, classic tune that has an upbeat feel and a strong strumming pattern that is worth anyone’s time to learn. This song is largely responsible for the band’s commercial exposure, becoming extremely popular after they played it on the UK’s Top of the Pops show in 1973. Since then, it’s been a bit of an iconic song in popular culture, having very famously been used in the Quentin Tarantino movie Reservoir Dogs during the torture scene.
The song has a great groove and lively feel to it, so be sure to strum with some power. Tapping your feet to the downbeat can also help a lot as you’ll need to perform upstrokes on the offbeat while the downbeat is left silent.
Wonderwall by Oasis

Click Here for tab for Wonderwall by Oasis
Wonderwall was of course going to make the list. A classic song that absolutely everybody should know from British pop/rock (or some say Britpop) legends, Oasis. It’s such a quintessential song to learn and cover that some people ridicule it for its overuse, but don’t let that deter you. It’s a classic. From their second studio album (What’s the Story) Morning Glory? The song is about an imaginary friend who will come and save you from yourself.
For this song, you’ll need a capo on the second fret of the guitar to make the chords a little easier to play. The nice thing about this is even though you’re moving through chords pretty quick, they are all quite close to each other and easy to reach.
Brown Eyed Girl by Van Morrison
Click Here for tab for Brown Eyed Girl by Van Morrison
This song makes wonderful use of multiple melodies. You’ll hear the bass movement, acoustic guitars strumming chords, and electric melodies all set to some great catchy vocal melodies. First released in 1967 as part of the album Blowin’ Your Mind!, unfortunately, there is a bit of drama behind the track. Due to the recording contract which was signed, he never received any royalties for the song.
As mentioned before, there are a lot of layers and counter-melodies playing here. It’s tempting just to go for the strummed chords, but don’t be afraid of tackling the leads if you want! They will sound great on acoustic too and help to keep things interesting in case you want a little more than just ‘strummed chords’.
Can’t You See – Marshall Tucker Band
Click Here for tab for Can’t You See – Marshall Tucker Band
A beautifully melodic track with a powerful vocal performance. It has elements of country and southern rock. Released as the first single from their first album (which was self-titled) and, for a first outing, did very well commercially, hitting the number 75 spot on the Billboard Hot 100.
This is a great all-round song to learn for beginners because it has both fingerpicking and strumming which you will seamlessly jump between. At first glance, it might look a little ‘notey’, but once you sink into the groove, I’m sure you’ll find that it all feels quite natural and comfortable to play.
Chasing Cars by Snow Patrol

Click Here for tab for Chasing Cars by Snow Patrol
A wonderfully heartfelt and emotion-filled song with impeccable vocal delivery. Taken from their 2005 album Eyes Open, the song gained much of its traction and notoriety due to being featured in the popular television series Grey’s Anatomy. The song is to-date their biggest, primarily due to the rising popularity of digital online sales which helped the song spread like wildfire.
The song starts with a very simple melody which is played on a clean electric guitar, but it also works great on acoustic as it’s so simple to play and doesn’t use any gain. Then for the chorus, there are just simple 3 string chords that can be played using all downstrokes, so there’s no strumming pattern to memorize here.
Drive by Incubus
Click Here for tab for Drive by Incubus
A song that people who may have watched television channels such as MTV2 will remember very well. An infectiously catchy song with a guitar section that uses some very cool chord voicings. This was their big breakthrough single that allowed them to launch their career.
While this song uses a fairly simple strumming pattern, the main draw is the vocabulary of the chords that are used. There are no generic sound chords and it’s a great way to expand your repertoire of chord voicings. The 4 chords are: Em, Em9, Cmaj7, and Em/A.
Songbird by Oasis

Click Here for tab for Songbird by Oasis
A unique offering from Oasis, as it was the first single written by Liam Gallagher instead of his brother Noel. Yet it still retains all the greatness you’d expect from an Oasis song, catchy and emotive vocal melodies with interesting and melodic acoustic guitar. This is a single from their fifth album titled Heathen Chemistry.
You’ll probably notice some similarities with other Oasis songs such as Wonderwall. The goal here isn’t to reinvent the wheel, simply to provide a great, well-written song. You’ll be playing big-sounding open chords exclusively here, which are all very comfortable to hold. Plus, there are only a couple of chords to remember, making it a very easy/fast song to learn.
A Horse With No Name by America

Click Here for tab for A Horse With No Name by America
America began on a strong note with their first single A Horse With No Name, which was, and still is, their most successful single. Topping charts in multiple European countries and going Gold in America. But initially, the album was released without this single, which hurt its popularity.
The song has some nice chord voicings. Try to get in the flow with the strumming pattern, since that’s where a lot of the personality of the song originates from.
A Long December by Counting Crows
Click Here for tab for A Long December by Counting Crows
A Long December is a beautifully written alt/soft rock song, the second promotional single from their album Recovering the Satellites. For the current notoriety of the band at that time, the single did very well, hitting the number 5 spot on the US Billboard. The song is a reflection on tragedy and loss, but with a slightly positive ‘silver lining’ kind of spin.
To make this easier to play in key on an acoustic guitar, it will help to have a capo on the 3rd fret. Something to keep note of here is the dynamics of the song. Pay close attention to how he hits some parts softly and other parts harder to bring out more emotion.
Ain’t No Sunshine by Bill Withers

Click Here for tab for Ain’t No Sunshine by Bill Withers
Like many others on this list of easy acoustic guitar songs for beginners, this single was hugely responsible for Bill Withers breaking through to a more mainstream audience, charting number 3 on the Billboard Hot 100 and appearing on the popular American TV show American Idol. It’s also been certified Gold in the US, selling over 1 million copies.
This song focuses quite heavily on the rhythm. As a result, the strumming pattern is fairly involved and is a great opportunity for you to learn some creative and percussive patterns. You can play the song focusing more on chords, or turn it into more of a finger-picked version where you will pick the bassline with your thumb while your fingers pick the higher chords.
All Summer Long by Kid Rock

Click Here for tab for All Summer Long by Kid Rock
You’ll probably recognize the guitar line from Sweet Home Alabama by Lynyrd Skynyrd. But this song can stand on its own two feet, with its catchy chorus and upbeat feel, it’s a great song to jam with friends. It’s the third single from his album Rock n Roll Jesus (not an album of worship songs, FYI) and was so popular he even performed it at the 2009 Grammy Awards.
Although there are electric parts under the song, it’s all underpinned by strummed acoustic guitar chords. If you wish, you can play the lead parts on the acoustic too. Or if you just need something to sing over, you can just strum the chords. Either way, the song is a ton of fun to learn and play, and is sure to be an asset to your song library.
American Pie by Don McLean

Click Here for tab for American Pie by Don McLean
This is a classic folk song from the ’70s, written by Don McClean as part of the album also titled American Pie. The song is written as a way of mourning the loss of numerous rock and roll legends who passed away in a plane crash in 1959. These were huge childhood influences on Don and to him, their deaths marked the end of the rock-and-roll generation.
The interesting thing about this song is even as the chords are being played, there is an implied melody. That is to say, you can distinctly hear the vocal melody that’s used during the chorus. This requires a bit of control over the strings you hit as you strum, but is something that any beginning player can master.
Back to December by Taylor Swift

Click Here for tab for Back to December by Taylor Swift
Treading the line between ballad, country, and a slightly orchestral flair, as usual Taylor Swift offers a catchy and memorable song that’s a ton of fun to play. This is from her third studio album titled Speak Now and was met with decent critical acclaim. It hit the number 6 spot on the US 100 Billboard and garnered almost 250,000 in digital purchases.
For this song, your life will be a little easier if you have a capo available for the second fret. And you only need to remember 5 chords for the entire song which are C, Am, Fsus2, Gsus4, and Em.
Before You Accuse Me by Eric Clapton

Click Here for tab for Before You Accuse Me by Eric Clapton
Eric actually recorded this song four times. Originally it had a lot of electric guitar in it, however the most popular rendition is an acoustic ‘unplugged’ version. This would also be released on his album Unplugged which went on to win a Grammy in 1992. The single has become a popular part of his live setlist, being played on many tours over the decades since its release.
This song has a great bluesy feel to it. You’ll be playing a groovy bassline mostly on the lower strings while all the melody happens on the higher strings. It can look quite complex at first, but if you memorize it bar by bar it’ll all make sense and you’ll see it’s quite simple to play. It’s a great chance to expose yourself to the blues style and that all important b5 note.
Big Me by Foo Fighters

Click Here for tab for Big Me by Foo Fighters
This song was hugely popularized because of its music video, which mocked stereotypical commercial advertisements by parodying the brand ‘mentos’ with their own, fictional brand called ‘footos’. The video garnered massive playtime on music television channels, contributing hugely to the song’s popularity. But this, unfortunately, prompted fans to start throwing mentos at the band when they would play this song live, forcing them to swiftly remove it from the setlist.
This is one of Foo Fighters’ lighter songs and it works great on an acoustic guitar. It can be played with some easy open chords that are all played quite low down on the neck, so should pose no challenge for newer players.
Blackbird by The Beatles

Click Here for tab for Blackbird by The Beatles
Inspired by classical Sebastian Bach music which was adopted into the opening riff of this song. The meaning of the song remains a little ambiguous, as there have been conflicting stories as to what exactly the song is about. It’s been said that the song discusses racism, but another story says it was written about Paul McCartney’s ill family member who used to listen to a bird sing at night.
You’ll definitely get a little bit of that classic sensibility when learning this song. There’s a very distinct bassline and higher melody. Don’t be deterred if you think it looks too ‘notey’. Once you have the rhythmic sequence memorized, you’ll find it feels very comfortable to play.
Blowin’ in the Wind by Bob Dylan

Click Here for tab for Blowin’ in the Wind by Bob Dylan
A deeply contemplative song that tackles the nature of ignoring complex problems, turning out heads away from these issues so they’re left blowing in the wind. Not designed to be a complex song, it has a great relaxed feel that you can sink into and enjoy. The song is from his The Freewheelin’ Bob Dylan album.
The main thing to focus on here is the strumming pattern as it repeats for the large majority of the song. Outside of that, it uses very simple chord shapes, utilizing both minor and major chords, and should pose no problem for a beginner to learn quite quickly. It’s also easy enough to play, that you can sing over it comfortably.
Blowin’ Smoke by Kacey Musgraves

Click Here for tab for Blowin’ Smoke by Kacey Musgraves
A great country-rock song that can also be played just as a solo acoustic piece. It’s from Kacey’s first album titled Same Trailer Different Park and performed very well for just her second single, selling over 135,000 copies in the US. The song is written about a waitress who wants to do better in life, but doesn’t intend on making the necessary changes so is just “blowin’ smoke”.
This is about as easy as it gets and makes an exceptional beginner’s song because it only uses 2 chords, A and D. The strumming pattern is just as simple with a controlled downstroke on each beat, it doesn’t get much easier than this!
Bottoms Up by Brantley Gilbert
Click Here for tab for Bottoms Up by Brantley Gilbert
Another fantastic country-rock song from Brantley Gilbert’s third studio album Just as I am. It’s a very effective song that has a great vibe and modern production. Just simple fun! It was a commercial success, hitting the number 1 spot on the Country Digital Songs chart and selling over a million copies in the US alone.
The song contains a mixture of acoustic and electric guitar parts. So depending on how adventurous you want to get, you may wish to work some of the arpeggiated electric guitar sections into the acoustic parts. If you are a beginner, we recommend sticking to the acoustic chords.
Boulevard of Broken Dreams by Green Day

Click Here for tab for Boulevard of Broken Dreams by Green Day
Green Day are well known for their high-energy punk and pop/rock songs. But this is more of a ballad-esque effort that sees vocalist Billie Joe Armstrong reminisce about his time in New York City, and his experience of feeling so alone in such a busy place. The song was unbelievably successful, being the ninth most sold single for the entire 2000-2009 decade.
You’ll need a capo on the first fret for this song if you don’t want to have all the extra effort of barring everything. Outside of that, it’s mostly played using large, open chords and there are a few small sections with some down-picked power chords in them. Feel free to mimic any electric guitar parts on the acoustic too.
Boys ‘Round Here By Blake Shelton

Click Here for tab for Boys ‘Round Here By Blake Shelton
A country tune with a ton of attitude, Boys ‘Round Here was a single for his seventh studio album, Based on a True Story. Despite receiving mixed critical reception, it was enjoyed a great deal by his fanbase and peaked at number 1 on multiple charts. To date, it has sold over 2.5 million copies in the US, which means it’s been certified 5x platinum. It remains one of those acoustic guitar songs that everyone can sing along to.
While the basic chord progression is typical to what you might expect from a commercial country song, some interesting rhythmic timings are happening within the strumming pattern that will require you to ignore the downbeat and instead accent the upstroke. Don’t worry! It’s not as hard as it sounds and it should pose no challenge for a beginner.
Breakfast at Tiffany’s by Deep Blue Something

Click Here for tab for Breakfast at Tiffany’s by Deep Blue Something
This is Deep Blue Something’s best-selling single, which was released in 1995 as part of the album 11th Song and Home. Unfortunately, since then the band has not had any singles with this level of commercial success. The song follows a relationship that is on the verge of a breakup, and the man references the movie Breakfast at Tiffany’s as a good commonality between them, and why they should continue to work on their relationship.
This is an alternative rock song, so there is electric guitar in addition to the acoustic layers, but don’t worry about them! Just play any guitar part you wish, as they all follow the chord progression. The acoustic part of the song just uses some easy open chords and a simple strumming pattern.
Daughters by John Mayer

Click Here for tab for Daughters by John Mayer
John Mayer is an extremely high-level player known for his virtuosity and emotive phrasing. But that doesn’t mean every song he plays is technical. This is an overall simpler song from him and one that beginners can dig into a little. This is the third single from the Heavier Things album, which won a Grammy and has sold over 1 million copies.
The song uses (almost) big 6 string open chords exclusively, which makes it more accessible to beginners in that it is not as ‘notey’. The main thing to ensure is that the ‘open’ strings in between the ones you need to hold notes on are not being choked and have the room they need to vibrate freely.
Don’t Think Twice It’s Alright by Bob Dylan

Click Here for tab for Don’t Think Twice It’s Alright by Bob Dylan
This is a single taken from Bob’s 1962 album The Freewheelin’ Bob Dylan, and although the song has achieved its own level of success, it’s also been famously covered by other artists including Peter, Paul, and Mary. The song (or at least the title) was intended to be a line you could say to yourself to instantly feel better.
Like many of Dylan’s acoustic guitar songs, this is primarily finger-picked, but one of the things that make it so easy and accessible to beginners is that a lot of it is ‘monophonic’, that is to say, there is only one note playing at a time. This makes it very easy for beginners to dive into without needing to think about multiple melodies, or bass and melodies going on at the same time.
Every Rose Has Its Thorn by Poison

Click Here for tab for Every Rose Has Its Thorn by Poison
A mellower effort from Poison as they simmer down their usual glam metal and hard-rock style for a softer and more ballad-esque outing. This was the third single released from Poison’s album, Open Up and Say … Ahh! It’s also one of their biggest successes, claiming the number 1 spot on the US charts for 3 weeks. So needless to say, it’s a must-learn for everyone!
Fortunately, it’s also incredibly easy to play. The acoustic part very much has its role in this song, so it’s perfectly okay to ignore the electric guitar parts. All the chords are very easy to hold, the main thing to focus on is the strumming pattern, ensuring it’s in line with the song for the small embellishments that are peppered throughout.
Fast Car by Tracy Chapman

Click Here for tab for Fast Car by Tracy Chapman
Tracy Chapman is a prolific American singer/songwriter who has a mighty four Grammy Awards under her belt. Fast Car is her primary single from her self-titled debut album and is also one of her biggest songs ever. It’s generally considered a must-learn for new players. This single received three Grammy award nominations, winning one.
For this one, you’ll be playing a very distinct and iconic melody on the higher strings, but of course around that are bass notes and many embellishments adding extra flavor to the notes of the melody, essentially turning them into chords. An easy way to approach this is to only play the main melody first, and add in the extra note and sections as you feel more comfortable with the song.
Hallelujah by Jeff Buckley

Click Here for tab for Hallelujah by Jeff Buckley
While originally recorded by Leonard Cohen, Jeff Buckley recorded a fantastic cover of it that is, in many ways, one of the most popular versions of the song. Originally it was released as part of his album titled Grace but then was released ten years after Jeff Buckley had passed. The song carries a heavy amount of emotion both in the chords and vocal delivery.
Although there are various renditions of the song around, one of the most popular is the fingerstyle one where the chords are outlined as ‘arpeggios’, which means they are played one note at a time instead of as whole chords. This is a really important technique to learn as a beginner and this is the perfect song to practice on as it has a nice, slow tempo.
Perfect by Ed Sheeran

Click Here for tab for Perfect by Ed Sheeran
An extremely popular single from Ed from his third album, ÷ (yes, that’s the name of the album). But interestingly, the song was released a second time as a duet with legendary American pop star Beyoncé. The album charted particularly well in the UK and received numerous nominations at the 2018 MTV Video Music Awards.
For this track, you’ll need a capo on the first fret of the guitar. In this scenario, the capo is quite necessary. Removing the need to fret every ‘0’ note in the tablature make it much easier to play, without it your hands will be far too busy! This is a primarily fingerpicked song, but is slow and evenly paced enough that it is easily accessible to beginners.
Hey There Delilah by Plane White T’s

Click Here for tab for Hey There Delilah by Plane White T’s
A well known and catchy tune from the Plane White T’s album All That We Needed and Every Second Counts. Treading some kind of line in between folk, emo, and pop. This song was written about a girl Tom Higgenson was interested in, but they were not dating, so it’s a kind of ‘fictional love song’ for a non-existent couple.
This is a fingerpicked song that has your thumb playing the lower notes while your middle and ring finger picks the two higher notes. This might feel a little unusual at first as it requires a bit of finger independence, but it’ll begin to feel natural very fast!
Mad World by Gary Jules

Click Here for tab for Mad World by Gary Jules
A song you’re no doubt already familiar with, originally written by British synth-pop legends Tears for Fears. But one of its most famous and popular incarnations came from Gary Jules and was part of the soundtrack to the hit movie Donnie Darko. It was particularly famous in the UK, hitting the number 1 spot for three weeks.
While the Gary Jules version of this song is piano-led, the chord progression is equally effective when played by a synth (like the original version) and especially acoustic guitar. The primary goal of playing this on the acoustic is to let the chord progression really shine. Try to ensure all the notes are clear so each ‘voicing’ (note) within the chord is felt by the listener.
Sweet Caroline by Neil Diamond

Click Here for tab for Sweet Caroline by Neil Diamond
An absolute classic of the late ’60s, it was recorded and released exclusively as a promotional single after Neil was inspired by John F. Kennedy’s daughter, Caroline. He even had the opportunity to play it to her directly on her 50th birthday. It’s also been able to retain a lot of popularity over the years, never really falling out of favor with fans, and is still selling well today.
The acoustic guitar part for this is wonderfully simple, where you will just be hitting some easy and basic chords on the lower strings on the downbeat. The one thing that makes it a little interesting rhythmically is you will need to mute them quite quickly for the ‘rest’ on the upbeat.
Yesterday by The Beatles

Click Here for tab for Yesterday by The Beatles
Not only an incredible song from the Kings of Pop themselves, but the song is also so popular it’s been covered over 2000 times by various artists, making it one of the most covered songs of all time. It’s a simple song with a ballad-like feel that discusses a relationship that has ended and reminisces about ‘yesterday’ when they were together.
It has a nice and steady rhythm that is comfortable and simple to play. There is a fair amount of chordal movement, but you will notice they all sit around the same area of the instrument so should be easy to work through.
Heart of Gold by Neil Young

Click Here for tab for Heart of Gold by Neil Young
Taken from Neil’s fourth album Harvest, this is a classic rock/country rock song that has a great melodic feel with just a bit of bluesy/folk twang thrown in. This was the only single of Neil’s that charted in the UK, but it is still very widely loved and has enjoyed continued success, including Rolling Stones magazine ranking it amongst the best songs of all time.
So while there are tons of easy open chords, in between the bars there are a lot of small country/blues licks and phrases thrown in. They might seem fast, but if you play these using hammer-ons and pull off, it becomes much easier to get the speed required to execute them.
Used to Love Her by Guns N’ Roses

Click Here for tab for Used to Love Her by Guns N’ Roses
Taking a break from the usual soaring electric guitar sound of Guns N’ Roses, for Used to Love Her, they sink into a more melodic feel and bring out the acoustic guitar for a wonderful acoustic rock ballad. The song was part of their 1988 release G N’ R Lies but didn’t get its single release.
You’ll need to tune each string on your acoustic down by 1 semitone to play this song. But don’t worry! You don’t need to change strings or anything, as it’s close enough to the original tuning that it won’t cause any issues with the string tension. This song uses a lot of smaller chords that will only span 1 or 2 strings making it very comfortable for beginners to play.