
Intonation is one of the core pillars of guitar setup, and yet, it’s something that few guitarists truly understand, and even fewer are able to adjust on their instruments.
A guitar with improperly adjusted intonation may sound in tune when playing open strings, but as soon as you fret any notes or chords, it will immediately sound off-pitch.
I have provided this guide to walk you through exactly what intonation is, how to diagnose improper intonation, and the methods for adjusting your guitar’s intonation, but for now, here are some key takeaways to consider when it comes to intonation:
Intonation can be adversely impacted by:
- Changing string gauge
- Worn frets
- Dropping or mishandling the guitar
- Old strings
- Overly high action
Intonation can be checked by:
- Playing each string at the 12th fret
- Comparing the pitch of the 12th fret to the 12th fret harmonic
Intonation can be adjusted by:
- Reducing or increasing string length by adjusting your guitar’s bridge saddles
- Lowering action by reducing your guitar’s bridge saddle height
Contents
What Exactly Is Guitar Intonation?
In order to properly adjust your guitar’s intonation, you need to understand what intonation is so that you can identify the root cause of your issues and address them accordingly.
Fundamentally, intonation is a measure of your guitar’s tuning along the full fretboard, from the nut to the top fret. A properly intonated guitar will have perfect, or close to perfect, pitch all the way up and down the fretboard on every string. Conversely, a guitar with improper intonation will experience out-of-tune notes on one or more strings at certain points on the fretboard.
No matter how good your tuner is, it can’t detect improper intonation when used to tune an open string.
If your guitar has generally good tuning stability on open strings, yet you notice out of pitch notes on higher frets, this is a strong indication that you need to take a look at your intonation.

What Can Affect Your Intonation?
It’s important to remember that intonation is never permanently set. Over time, especially on new guitars that are still being broken in, and old guitars that have looser tolerances, intonation can slip out of the normal range.
Besides that, old strings are a regular culprit. As they wear in different areas depending on specific use, they can cause intonation issues to drift up and down the fretboard. For this reason, when setting your intonation, always do it with fresh strings (after they have been stretched out, of course).
On older guitars, flat spots on frets, or general fret wear will cause you to have to push the string down further to finger notes. This increased travel will cause the strings to play sharp at those affected areas, again, indicating improper intonation.
Another possibility is that you fret differently when tuning and intonating than you do while you’re playing. For this reason, it’s always a good idea to check your tuning and intonation when holding your guitar as though you were playing it, rather than laying it flat on a bench.
How To Check Your Guitar’s Intonation?
The following steps cover the intonation procedure from start to finish. It may seem a daunting task, but it really isn’t difficult If you take your time and follow the guide.
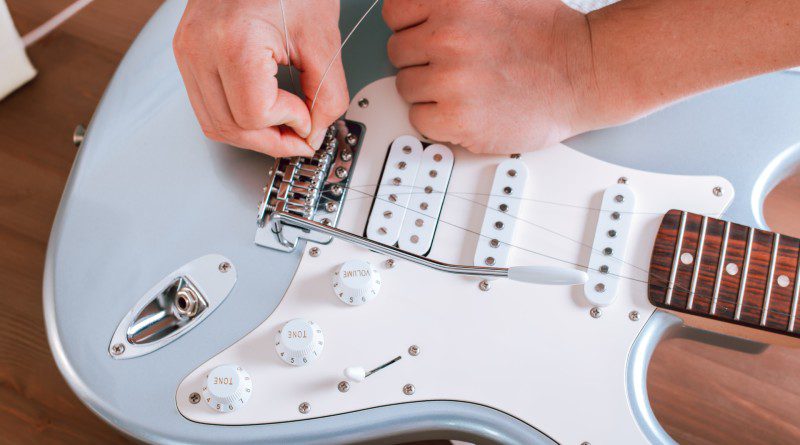
Step 1: Get In Tune
In order to get a reference point for your intonation, you need to make sure your guitar is properly tuned. If you don’t have access to a line-in or clip-on tuner, there are some decent tuner apps available for compatible smartphones.
It’s good practice to start tuning at the 6th string (low E). This string puts a lot more tension on the neck than the high E, so tuning it first means minimal readjustments once you have finished all 6 strings.
Adjust the pitch of each string up or down depending on what your tuner says to do. Once all strings have been tuned, play each string open again to ensure that additional tension or relief on the neck from your adjustments hasn’t thrown the tuning out as you progressed through the strings.
Step 2: Check The 12th Fret Harmonic
The fastest way to establish whether your intonation is correct is to check the pitch of each string when playing a note fretted at the 12th fret, followed by playing the natural harmonic at the 12th fret. Make sure you have followed step 1 and tuned up before starting.
To play harmonics, start with the low E, and gently touch the string with a finger directly above the 12th fret. Make sure you don’t actually depress the string; it definitely should not be in contact with the fret. Play the note by touching the string at the 12th fret and observe the reading on your tuner.
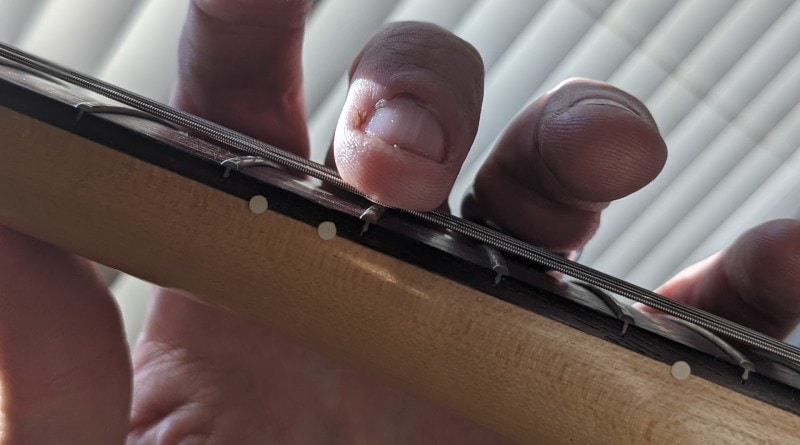
Step 3: Fully Finger The Note at the 12th Fret
Next, you’ll need to play the note at the 12th fret. To do so, fully depress the low E string all the way to the fretboard in between the 11th and 12th frets. Compare the reading on your tuner while fretting the 12th fret to the reading you got when playing the 12th natural harmonic.
If the note you play at the 12th fret is lower than the 12th harmonic, this means that the intonation is flat for that string. Conversely, if the note is higher than the harmonic, the intonation is sharp. If the note is the same, then no further action is necessary as the intonation is correct.
Step 4: Continue Through The Rest Of The Strings
Remember, intonation may be off on one string, several strings, or all of them. The only way you’ll know is to repeat the above steps on each string.
It is always a good idea to have a pen and paper handy to write down what you see on your tuner for each string. Alternatively, use your phone to take a picture of the tuner for your reference during adjustment if necessary.
How To Adjust Your Guitar’s Intonation?
In a generic sense, guitar intonation is adjusted by either shortening or lengthening the strings, depending on whether they registered sharp or flat when you checked them. I’ll point out now that you aren’t shortening or lengthening the string itself, more so the active length of the string, as in the distance from the nut to the saddle(s).
Some guitars have adjustable bridges and saddles, making it pretty easy to adjust intonation. Others, acoustic guitars, for example, have fixed saddles and bridges, making intonation adjustment extremely difficult.
What To Do If Your Intonation Is Sharp
If your intonation was sharp when you checked, this means that the string is too short. To fix it you will need to lengthen the string by adjusting the saddle down towards the bottom of the guitar.
What To Do If Your Intonation Is Flat
When intonation is flat, this indicates that the string in question is too long. To increase the pitch and bring it back into tune, you will need to decrease its length by adjusting the saddle up towards the headstock.
It doesn’t take much movement to make a noticeable difference, so these adjustments should be done in tiny increments. Remember, adjustments to string length will also affect open string tuning, so adjust accordingly before rechecking intonation at the 12th fret and 12th harmonic.
Guitar Specific Intonation Adjustment
Depending on the make and model of your guitar – and whether it’s an electric or acoustic guitar – the actual procedure for adjusting intonation can change quite significantly. Next, I’ll walk you through how to make intonation changes on some of the most common guitar brands.
Top tip – remember to stop and retune the open string with each adjustment you make before checking whether your changes have been effective.
Fender Style Bridge
There are two main types of bridge and saddle arrangements you’ll find on a Fender electric guitar. As both are extremely popular, I’ll cover both styles.
Stratocaster

The bridge on a Strat is one of the easiest to adjust for intonation, it features six individual saddles that can be separately tweaked. The saddles are adjusted by turning a screw at the base which moves them up or down.
A clockwise turn on the screws pulls the saddle down, effectively lengthening the string. This is the action you need to take if your Strat or Strat-style guitar registered sharp when you checked the intonation at the 12th fret.
A counter-clockwise turn will shorten the effective string length, which will help to correct flat notes.
Telecaster
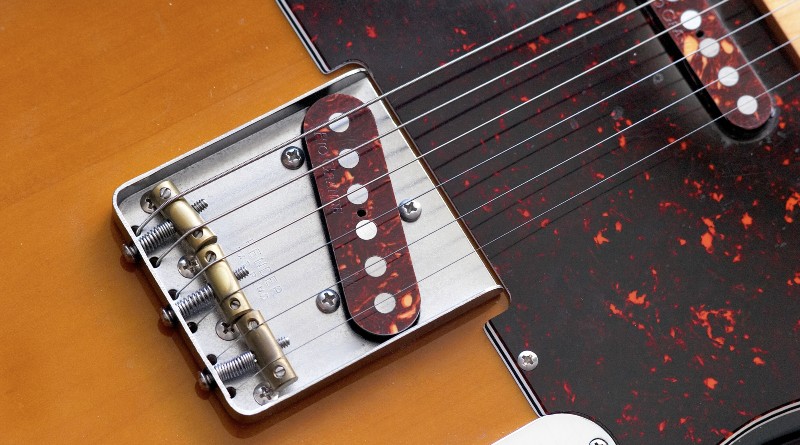
As more players seek the ‘vintage’ look and sound, they forget why advancements were made to change old designs, and the Telecaster bridge is a classic example. Vintage-style Tele bridges feature a 3-saddle brass barrel design, with 2 strings per saddle. The big issue here is that adjusting the intonation on one string will affect the string that shares the saddle, whether it needs adjustment or not.
The adjustment process is the same is it is on a Strat, there is a screw at the base of the saddle that you should turn clockwise to fix sharps, and counter-clockwise to fix flats, but be aware that this design does not allow for perfect intonation, and you may have to find a happy medium.
Gibson Style
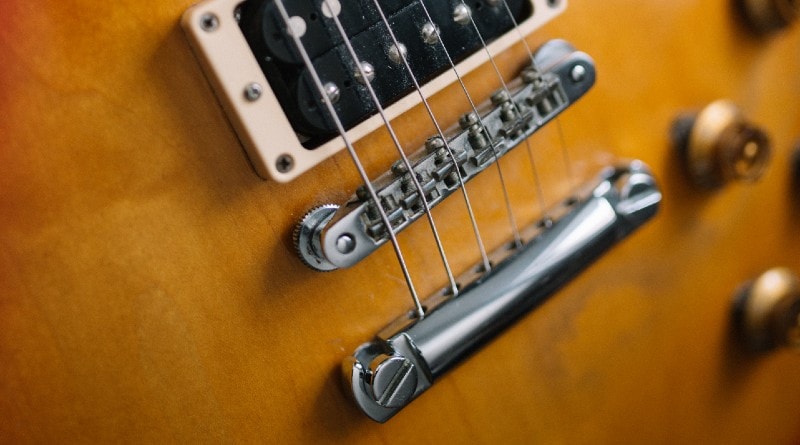
Gibson has pioneered many advancements in guitar technology, the Tune-O-Matic bridge on their electric guitar range being one of the most important. It features on pretty much every Gibson style guitar from Les Paul Style, SG Style, right through to the ES style guitars.
Tune-O-Matic bridges also feature six individual screw adjusted bridge saddles, but, because the screws are at the top end of the saddles, they work opposite to Fender style.
So, in order to adjust for sharp intonation, you will need to turn the screw clockwise. This will lengthen the string and lower the pitch.
For flat intonation, the opposite is true, turn the screws counter-clockwise and the strings will shorten, increasing the pitch.
Paul Reed Smith Adjustable Stoptail
Paul Reed Smith, or PRS, guitars are often fitted with a wraparound stoptail style bridge. Some feature individually adjustable bridge saddles, and some have fixed saddles. I will discuss the adjustable type first.
If you do have individually adjustable saddles on your PRS electric guitar, like the Gibson style Tune-O-Matic, these saddles are adjusted by a screw on the top side. It is a good idea to take this on with a small precision screwdriver to reduce the risk of scratching your guitar or pickups.
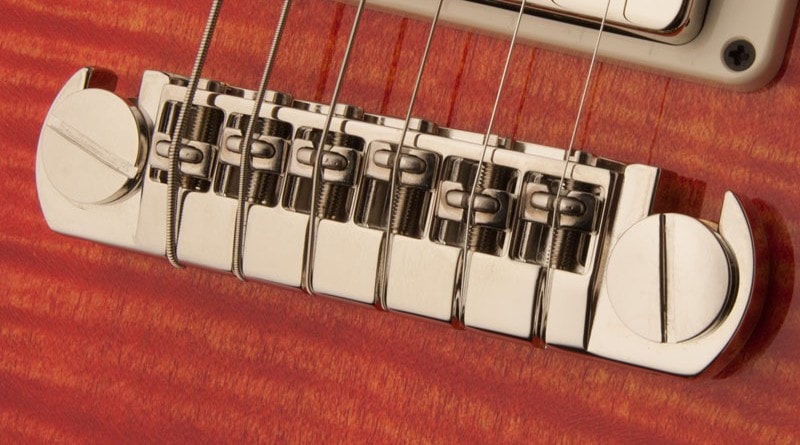
Top tip – wrap your screwdriver shaft and handle in electrical tape to even further prevent damage to your guitar when working on intonation.
With a PRS adjustable stoptail, turn the screws clockwise to shorten the string and increase pitch, or counter-clockwise to lengthen and decrease pitch.
If your PRS has fixed bridge saddles and you have intonation issues, unfortunately you are unlikely to achieve a perfect result when intonating as you must shift the entire bridge to make any kind of adjustment. This is especially true if you are having issues with just one string.
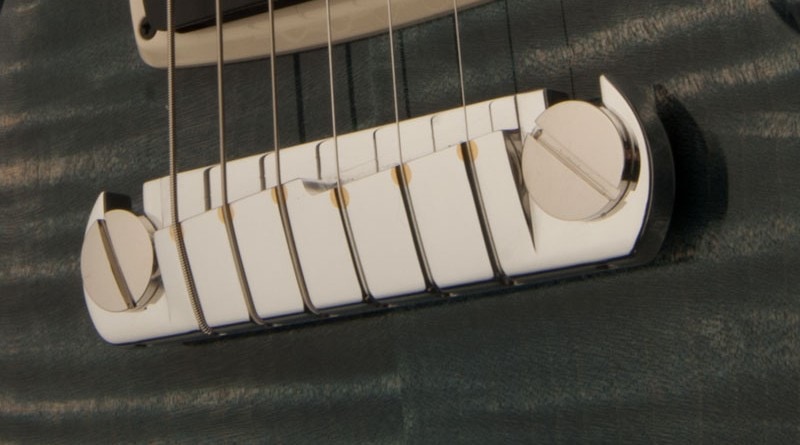
If you really need to make an adjustment to this type of bridge, make use of the screws located at either side to shift it to the left or right
There are two adjustment screws on the ends of the bridge that you can turn to angle either side of the bridge up or down, or to move it horizontally. Turning either screw clockwise will move the bridge away from the post with the net effect of increasing string length, and a counter clockwise turn will move it back towards the post to shorten the string.
For example, your low E is sharp, you will need to turn the bass side screw clockwise to make this adjustment. If all of your strings are sharp, you can turn both screws clockwise to make this adjustment.
Floyd Rose And Floyd Rose Style
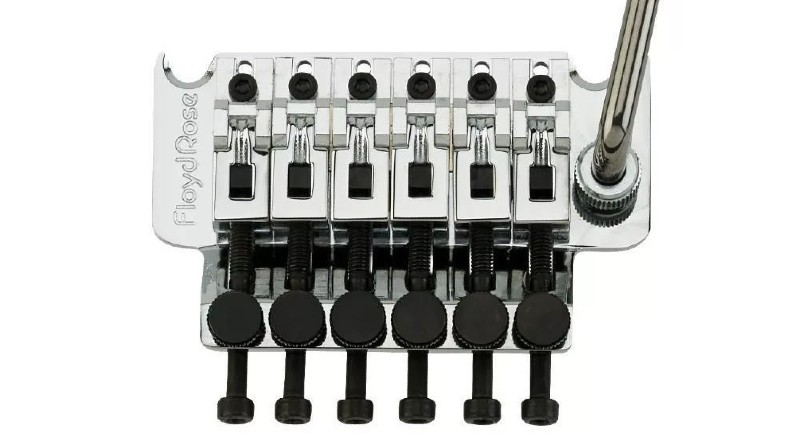
Floyd Rose bridges are really designed to be “set it and forget it”. The intention is that they firmly lock strings in place to allow massive divebombs without losing tuning. The downside is, when you do need to adjust your guitar’s intonation (or even just change the strings), it is a more involved process than other more commonly found bridges. For this reason alone, many will hardtail their Floyd to avoid the hassle.
To adjust the intonation on a Floyd Rose type bridge, first you will need to slacken the string you are working on, then loosen the hex nut that holds the bridge saddle in question down. Once the hex nut is slack enough, you can move the saddle up or down to shorten or lengthen the string as required.
You will then need to tighten the hex nut and retune the string before you can check if your adjustment was correct. If not, you will need to repeat this process until you achieve the correct intonation.
Acoustic Guitar Intonation
A typical acoustic guitar bridge features a set saddle, usually made of plastic, bone, or a synthetic bone substitute. The design of these saddles prevents any kind of adjustment to string length without permanent modification.
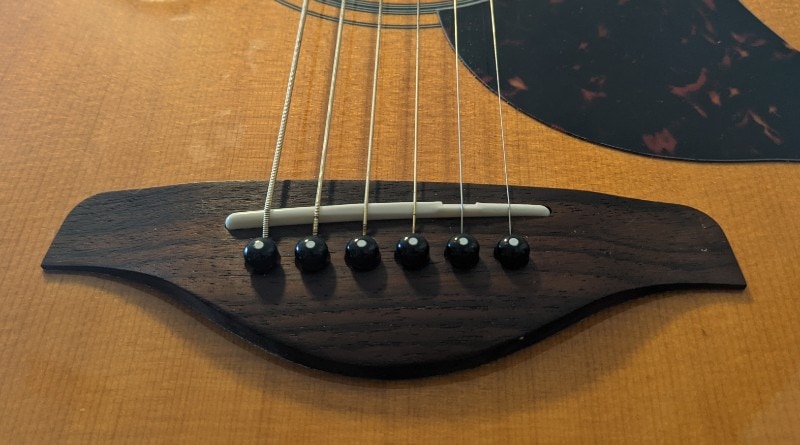
Filing the area on which the string you need to intonate sits can lengthen the string slightly but there’s no real way to shorten it, so if you are experiencing flat intonation on an acoustic guitar, there isn’t much that can be done outside of swapping the saddle for a taller one and filing accordingly.
That being said, some acoustic guitars come with a compensated saddle, one which has notches at the rest areas for the high E, B and G strings. They are also available as an aftermarket upgrade, and can provide some minimal adjustment for incorrect intonation on an acoustic guitar. However, even compensated saddles are non-adjustable, and may not fix your specific intonation issue.
Further Intonation Adjustment
It can happen that even after maxing out the available travel on your saddles, you still haven’t corrected the intonation issue. Fortunately, there are still some steps you can take to further adjust your intonation:
Truss Rod Adjustment
Many newer guitarists are intimidated by the truss rod, but remember, it’s there to be used. Its purpose is to correct the bow of your guitar’s neck (more on truss rods for guitars in our guide). If you have excess relief, or concave bow, on your neck, this can cause intonation problems as the strings are further away from the fretboard than they should be, resulting in excess travel when playing.
In this case, you will need to tighten the truss rod, adding tension to the neck and reducing the bow. Like a saddle adjustment, this should be done in small increments.
Height Of Action
The height of your guitar’s action is the distance from the string to the fretboard. Not only does this make a huge difference to the playability of your guitar, but it can also affect your guitar’s intonation. Excess action means the string needs to move further to contact the fretboard, and this can have a similar effect to bending a string, which intentionally alters pitch.
A reduction in action height will almost certainly help with intonation issues, but remember, too little action height will result in fret buzz, particularly at the high end of the fretboard.
For more on action, read our full guide.
Technique
Sometimes it’s not the tools, it’s the worker. Having too heavy-handed a technique can indeed cause problems with guitar intonation, and although you won’t need to adjust your guitar, you will need to adjust your playing style, which is in most cases way harder than a quick turn of a screw, especially for seasoned players.
If you find that you experience sharp intonation whenever you play, there is a good chance you are pressing too hard on the strings and bending them out of pitch as you do so. This is especially the case on an acoustic guitar where the thicker strings encourage people to play them too hard. If this is the case try to play with a lighter touch and see if it makes a difference. Reducing action height can help with this, too.

General Intonation Tips
These tips should make intonating your guitar a little easier, especially if it is your first time trying these adjustments. They should also help you to get better results from your adjustments.
Keep Your Strings Loose While Making Adjustments
No matter what adjustments you make to your saddles, you will put the open string out of tune, so, worry about your tuning later, and slacken the strings to prevent damage and breakages due to excess tension.
Not only do you risk breaking strings when adjusting under tension, but you also run the risk of damaging the threads on your adjustment screws, a risk that really isn’t worth taking.
Once you’ve made your adjustments, you can tune up and check the guitar intonation again.
Cover Up Your Guitar
It is always a good idea to place a towel between your tools and the guitar. Any little slip could cause you to put a nice big scratch in your finish. While it won’t affect the intonation, you will likely be kicking yourself for letting it happen.
Follow The Right Sequence
While there isn’t a hard and fast rule that says you must set up your guitar in a specific order, most techs and luthiers would agree that the best way to approach setup is truss rod first, action second, intonation third.
So, if you haven’t looked at your neck relief, or your height of action before diving into your guitar’s intonation, I would suggest you do so. Guitar setup is indeed a blend of art and science, but experience tells us that this method works.
Invest In a Quality Tuner
The better your tuner, the greater its accuracy levels. Yes, smartphone tuner apps are adequate for tuning (and can be quite accourate on an acoustic guitar, moreso than electrics), and can get you through an emergency intonation in a pinch, but if you’re taking the time to properly set up your instrument, using a quality tuner that breaks the notes down into individual cents will really help you dial in your intonation accurately.
Keep Your Strings Fresh
Not only do old guitar strings oxidize and sound dull, but the frets also physically grind them down, creating flat spots. These flat spots change the way the strings interact with the frets, and over time this will cause intonation problems to set in.
Obviously the more you play, the faster this will happen. Similarly, if you are a heavy-handed player, this will also happen more quickly. New guitar strings every 2 to 3 months should be sufficient for the average player to avoid string related intonation problems
Be Aware Of String Gauge
If you make a decision to change the gauge of your strings, this will almost certainly affect the guitar intonation. Heavier gauge strings cause more tension on your guitar’s neck, and unless you compensate for this at the truss rod, you will experience more of a bow, and consequently, improper intonation.
Give Your Guitar Time To Adjust
As I mentioned earlier, the truss rod should be your first adjustment. If you’ve made any changes to the truss rod you should give your instrument time to adjust.
Guitars require time for the fibers of the wood to settle when artificially placed under tension, so adjusting intonation too quickly after a neck adjustment can result in having to make further changes in the following days.
Guitar Intonation Recap
Perfect intonation is a bit like a unicorn, or the fountain of youth. Sought by many, found by none. There are so many factors that influence the way a guitar behaves, from temperature to humidity, through to frequency of use, and beyond. Some of these factors are within our control, some are not.
All we can do is take care of what’s possible and try not to worry about perfection. The key point is to get your guitar intonated to a point whereby it sounds good to the ear, and that’s all that really matters in the long run.