Reading guitar tablature (or tabs) is a skill that every guitarist should be familiar with, whether they are beginners or professional musicians. Tabs are a great tool that you can use to learn songs, solos, licks, or pretty much any musical fragment.
They are also quite useful to show someone else something simple quickly, without having to write it out in standard notation.
Tabs are typically straightforward, but there are a few elements that you must know how to interpret. This guide will provide you with all of the basic knowledge about guitar tabs that you’ll need to ensure that you’re making the most out of them every single time.
Want to learn more about music theory?
Check out our ultimate guide to music theory to find more jumping off points.
Contents
- Introduction to Guitar Tabs
- Tablature Layout and Interpretation
- Before you Play – Basic Information
- Reading the Tabs – Main Elements
- Symbols – Meaning
- Symbols – Upstrokes and Downstrokes
- Symbols – Hammer-On – “h”
- Symbols – Pull-Off – “p”
- Symbols – Slide – “/” and “\”
- Symbols – Vibrato – “V” or “~”
- Symbols – Bend – “b”
- Symbols – Mute/Rake – “x”
- Symbols – Palm Muting – “PM”
- Symbols – Tied notes/Ghost Notes – “( )”
- Symbols – Harmonics – “< >”
- Symbols – Tapping – “t”
- Conclusion
Introduction to Guitar Tabs
As you search for tabs for songs you’d like to learn, you will quickly realize that not all of them look the same. Some appear to be a bit more simplified and primitive, and others seem to have more information displayed and more thorough in their presentation.
In this guide, we’re going to show you all about the main types of tablature you’ll find throughout your musical journey: text tabs, interactive tabs, and a blend of tab and standard notation.
We will first explain the differences between each kind, tell you their strong and weak points, and then we’ll show you what every element means and how you should read them.
Text tabs
Text tablature is the oldest format for tabs that you’ll find. Although there are other more complete options available, this is still something you’ll encounter fairly often, so you should be familiar with them.
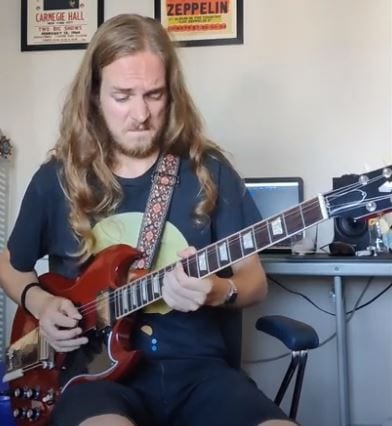
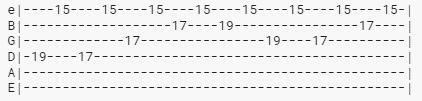
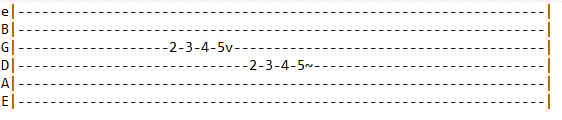
As the name implies, they are written on a text editor (.txt, Notepad), which makes them convenient for creating, editing, and sharing with others. The image below shows you what a typical text tab looks like.
As you can see, there really isn’t much to it. Each line represents a string on your guitar. The line at the top is your high E string, and the lowest line is your low E.
This format looks as though you took your guitar and placed it on your lap with the strings facing you. Obviously, if you look for tabs for other instruments such as a bass guitar, ukulele or a 7 string guitar, the tabs will have their number of lines set according to that instrument.
This format’s biggest advantage is its convenience factor. There’s no need to have any dedicated notation software in order to create them, as almost every computer will have Notepad or an equivalent text editing program that will allow you to create your own tabs without any issues.
However, it is not the most aesthetically pleasing format there is out there. Still, many websites still use it and you’ll find millions of tabs like these all over the internet.
The flaw that sticks out the most with text tabs is their inability to give you rhythmic information.
You can see every note that you have to play, but for how long should you play each one? Half a beat, a whole measure? If you don’t know the song very well by ear (even then it could be quite challenging) without an audio reference to go along with the tab, you will be missing out on some crucial information.
On the bright side – by being forced to use your ears, you’re developing one of the most important weapons in a musician’s arsenal, active hearing.
Interactive Tabs
Next, we’re going to cover the basics of interactive tabs. These are a nice upgrade from the older variety we’ve seen previously. They are more pleasing to look at as they’re not generated in a text file, and they come with some other advantages that make them far superior for anyone using them.
The biggest selling point for interactive tabs is the fact that you can play them and hear what the tabbed out notes sound like at their tempo.
This is a nice feature for an intermediate or advanced musician, but for a beginner, it will make a huge difference. Having the audio reference right there in the tab will help you to translate the visual reference from the tab, into how it should sound, speeding up the learning process.
With these tabs, you can expect to have a vertical line that scrolls through the tab as it’s being played, which will help you not lose track of where you are.
Additionally, you can change the playback speed, because starting slow and building up speed is essential to achieve perfection.
On complete tabs you will find even more features, such as the ability to hear more or fewer instruments from the song, looping certain sections, having a count-in for playing along, among others. Check below for an example of what an interactive tab looks like.

Right off the bat, we can tell that it is not just a prettier way of learning music. It is a lot more complete than its text counterpart.
They will include more information such as the time signature, some rhythmic information, among other elements that will allow you to learn anything a lot more effectively than if you were depending only on text tabs.
You might not want to learn how to read standard notation later on, but if you do, this could potentially be a nice stepping stone, since it is closer to it than text tablature. You get some of its elements in a simplified form, but you can still read the notes from the numbers that represent the frets on each string, which is the most appealing feature in this kind of notation.
Tab + Standard Notation
Finally, we’re going to be covering what is in our opinion, the most complete notation system frequently found on the internet, and the one we’d recommend looking for every time if you can find it.
This format is a fusion of standard notation (a lot of guitarists’ worst nightmare) and tablature. This combination gives us a very complete package that can be approached in multiple ways, depending on your proficiency with standard notation and tablature.
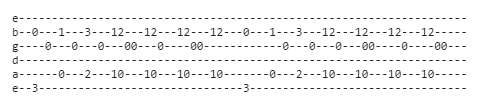
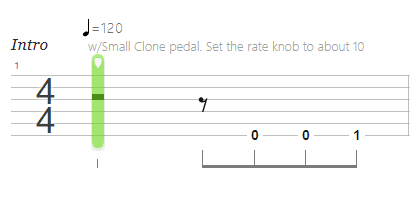
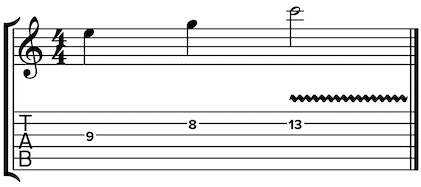
With these tabs, you will have a double staff. The top one is written in standard notation, as you’d find if you bought a sheet music book such as the Omnibook, which contains Charlie Parker solos, and the bottom staff is written in tablature.
Just like in the interactive tabs described above, you will get most of the audio features (play, loop, slow down, etc.). The image below is an example of this type of tab.
As you can see, the top staff is just normal, standard notation. If you have learned how to read it already, you could use it and be able to learn the music without any other resources. Unfortunately, the same cannot be said about the bottom staff, due to the lack of rhythmic information.
However, combine these two and you have a very solid means of learning new material.
The guitar can be a tricky instrument to read in sheet music, because the same note is repeated at multiple points up and down the fretboard. This makes it challenging to figure out where on the neck you should be playing some chord voicings or even entire phrases, since some fingerings will make more sense than others.
With the help of the tabs on the bottom half, this should come easily as it pinpoints exactly where to play each note, and you still have the top staff to give you accurate rhythmic information.
Many people have found that learning some tunes through this type of tab helped them to improve their reading skills since having audio feedback as you’re reading will eventually solidify your knowledge of figuring out how some things sound when they are written in notation.
Think of this as something close to watching a show in a foreign language that you mostly understand, but with subtitles in your own language. Having this kind of support will undoubtedly make you better at it without a huge effort.
Tablature Layout and Interpretation
Before you Play – Basic Information
Now that we are familiar with the types of tablature available, let’s go deeper into the details and learn about how to interpret some of the symbols that you will likely encounter while reading. After all, you don’t play all the notes with the same technique, dynamics, and articulation. Knowing the right fret to press is just a part of the task.
The first thing to take into account is the order of the strings that each line represents. This is the same in every tab, whether it’s a text format or an interactive one.
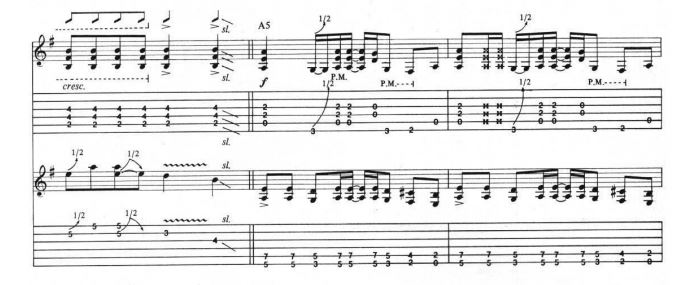
Pick up your guitar and lay it flat on your lap, strings facing up. This is how you see them in the tabs. The line at the top is your high E string. Just memorize it by thinking that the highest line is also your highest note, if you play all the open strings.
The same logic applies to tablature made for other instruments, just take into account that not all of them have the same tuning as the guitar (eBGDAE), such as ukuleles.
The number of lines can also vary, so expect anywhere between 4 to 6 lines when searching for ukulele or bass tabs.
In the image above, you will notice that in order to avoid any mistakes, the lines corresponding to each string have the notes that go along with them written on the left. If you see nothing, just assume that you should be in standard tuning.
However, if you’re looking at a tab of something played in an alternative tuning, you should look for that information. You will either have the pitches next to each line, or you may just have a small indication which tells you what you need to change before starting to play. This is very common for songs in Eb tuning (think Jimi Hendrix, Stevie Ray Vaughan), songs in Drop D or other less common tunings such as DADGAD.
Apart from this crucial information, you can also frequently find other indications, such as the tempo at which the song is usually played. If the song requires a capo, expect to see something telling you the fret where you must place it.
Other elements typically found here are the effects that give a particular tune its distinctive character, such as the modulation effects we hear on some Van Halen songs, for instance. It might tell you to use a Chorus, Flanger, Delay, and maybe even give you tips on how you should set the controls so you can get closer to the original artist’s tone.
Reading the Tabs – Main Elements
Numbers – Meaning
In tablature, the numbers you encounter each correspond to a fret on your guitar’s neck. First, identify the string that the line in the tab represents, and then play the note in the fret that corresponds to the number you’re reading.
For instance, if you see the number 1 on the lowest line, that means you have to place your finger on the first fret of the low E string. A number 5 on the top line means you must play the note at the fifth fret of the high E string, and so on.
The number 0 is used for open strings (when you play the string without using your fretting hand on it). If there is nothing written on a line, don’t play that string and try not to let it ring while playing the others.
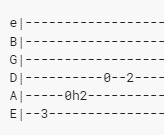
Numbers – Written Left to Right and Stacked
After making sure you’re tuned up properly, you’re ready to start reading. Although it probably goes without saying, tabs are read from left to right, one note after the other, as if you were reading a normal book or standard notation.
However, some numbers will appear stacked on top of each other. With interactive tabs, the audio reference is going to give this away very easily, but if you only have the text format to work with, you need to be able to interpret this properly or it just won’t sound right.
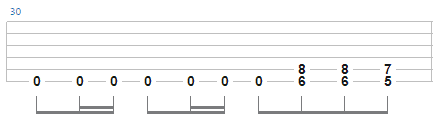
In the image above, notice that all the notes are written from left to right, none of them appear on top of each other. This means you should play them in sequence.
Unless there’s an indication that tells you that a certain note should keep ringing, you should play them individually.

Since guitars allow you to play several notes at the same time, you must pay attention to how the information is displayed on tabs, as you aren’t only going to be playing melodic single note lines.
When notes appear stacked on top of each other (such as in the image above), you should play them all at the same time.
It may be just two notes, or a full chord, played on multiple strings. Although tabs always give us a comprehensive perspective on what is being played, this is where they shine the most. Reading standard notation can be tricky when you have intricate chord voicings, and you can end up crossing your fingers while trying to figure out a logical way to play the notes that makes sense in that context.
With tabs, every note is pinpointed by its corresponding number on each line.
Stacked numbers don’t always spell out a chord. It can be just a certain interval being played within a riff or phrase. You will find hundreds of examples like these if you start learning chord melodies, which incorporate melodic and harmonic elements into an arrangement for a single guitar.
Symbols – Meaning
Don’t panic if you start to find characters on the lines that aren’t numbers while reading. These symbols are here to tell you which techniques you have to use in order to play the music properly.
These include hammer-ons, pull offs, slides, vibrato, and many more. In this part of the guide we’ll be going over the main symbols you will come across so that you aren’t caught off guard.
Depending on the tablature format you encounter, you’ll see that some of these techniques might be represented in different ways as well.
In the text format, most symbols will be placed immediately before or after their corresponding notes on the lines.
On their more modern counterparts, the extra space and possibilities allow for a better presentation of these instructions. In this section, you will be able to observe several examples in different formats.
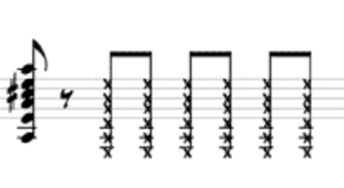
Symbols – Upstrokes and Downstrokes
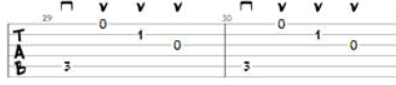
Following a certain picking pattern might make a big difference in your ability to play something or in making it sound right. For this, there are upstroke and downstroke symbols in many tabs.
They are also frequently used to notate strumming patterns for rhythm players. In the absence of this information, use whichever feels the most convenient based on your experience.
These symbols appear above the tab, directly on top of the note that you should pick up or down.
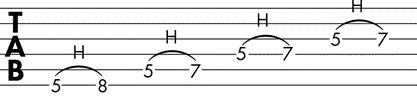
Symbols – Hammer-On – “h”
The hammer-on is one of the most widely used techniques in guitar, regardless of the style.
It is achieved by played a note on a fret, and while it is still ringing, you press down on one of the next frets on the same string, without picking it with your right hand. The pressure applied by your finger should cause that note to ring.
In text notation, a hammer-on appears as an “h” in between the note that you pick and the one that rings as a result of you hammering-on it. On more modern tablature, you’ll see a curved line connecting both notes, although you can still find the letter “h”, which leaves no room for doubt.
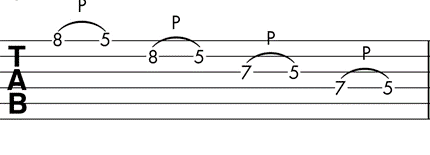
Symbols – Pull-Off – “p”
The pull-off technique is essentially the opposite of the hammer-on. While a fretted string is still ringing, you lightly “pull” it as you remove the finger that was holding down the note. Doing this the right way allows a lower note to ring without you having to pick it with your right hand.
On tablature, the pull off is represented in the exact same way as the hammer-on, except with the letter “p” instead. If you only have the curved line and no letter to tell you which technique to apply, just look at the notes involved.
You can only hammer-on to a higher note, and you can only pull-off to a lower one, so it is pretty self-explanatory.

Symbols – Slide – “/” and “\”
In text tablature, slides are represented by a slash or a backslash.
The first applies to slides from a lower to a higher pitch, and the backwards slash represents slides from a higher to a lower pitch. Just imagine them as real life ramps and you won’t ever mistake one for the other.
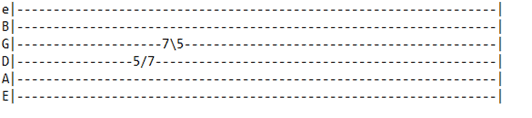
In more modern tabs, you will find slides notated with a line between each note. This line will also be slanted accordingly to the slide, just like in the previous example

Symbols – Vibrato – “V” or “~”
Vibrato is a staple technique for guitarists everywhere. It is when you waver a note back and forth by ever so slightly bending it and releasing it repeatedly. Many guitarists are known for their very characteristic approaches to this expressive tool.
In text tabs, vibrato will either be represented by a “V” or a “~”.
Alternatively, a wavy line placed above the staff also indicates to us that we should apply vibrato to the notes above which it is placed. This one is frequently found on interactive tabs or standard notation.
Symbols – Bend – “b”
Bending is another classic technique employed by thousands of guitarists to make their instruments sing. Like vibrato, it can get you closer to a real human’s voice, which is what many try to emulate.
In text tabs, bends are notated the following way: you first write the note that will be bent, then place the “b” which means “bend”, and lastly, the note that corresponds to the pitch you need to hit.
For instance, a half tone bend could be notated like this: —5b6—
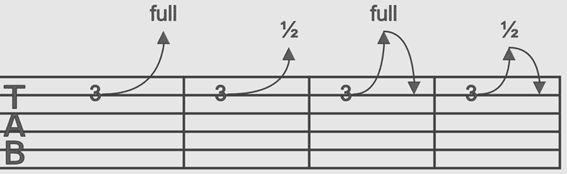
Outside text tablature, bends are more visually noticeable and you only see the note you’re bending, not the target pitch.
A curved line starting from the initial note corresponds to a bend, with an additional indication to let you know if it is a half bend (a semi-tone), a full bend (a whole tone), or even more. Check the image below for clarification.
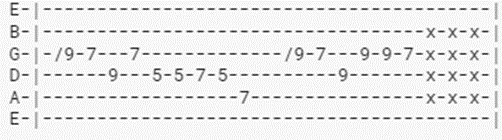
Symbols – Mute/Rake – “x”
Muted notes are represented by an “x” on tabs. You are most likely going to find these in the funk genre, where guitarists often rake the strings in a percussive manner, to keep the groove going.
To pull this off, touch the strings lightly, applying just enough pressure for them not to ring, but without pressing down on any of the frets, you don’t want to hear any notes.
These can be done across all strings on the guitar, or on selected notes.
Listen to the very beginning of “Voodoo Chile” by Jimi Hendrix and you’ll hear him raking the strings with a wah pedal, giving it that distinctive sound before he starts the intro melody.
This technique is notated the same way in text tablature and other formats.
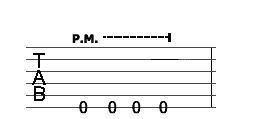
Symbols – Palm Muting – “PM”
If you are a metal music fan, you most likely already know what palm muting means. It is when you rest your palm on the bridge of your guitar in such a way that still allows notes to ring, but slightly muted.
Most of the notes on the intro to Metallica’s “Master of Puppets” are palm muted, for example.
In tablature, palm muting is represented by the initials “PM” and a line that goes as far as the palm muted notes should be played. This technique is notated the same way in text tablature and other formats.
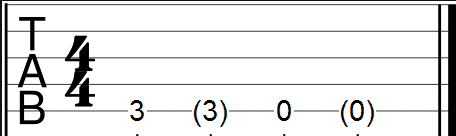
Symbols – Tied notes/Ghost Notes – “( )”
Be careful, parenthesis in guitar tabs can have two different meanings, so pay close attention to the context in order to understand which one is being used in each case.
One of their applications is to let you know that a given note you’ve played in the current bar is meant to keep ringing as the music advances to the next bar. In standard notation, these notes would appear tied by a slightly curved line.
The second way of using parenthesis is to write a “ghost note”.
Ghost notes are more felt than heard. In other words, they have their rhythmic value, but the pitch isn’t very evident. Bassists use them a lot to create tension and tighten up the groove in their basslines, but ghost notes can be played on just about every instrument.
As mentioned before, since this symbol can mean more than one thing, make sure to analyze the music so you don’t mistake one for the other when you play.
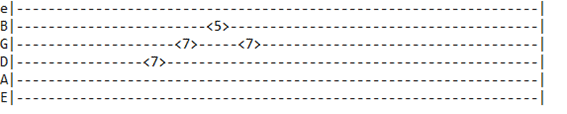
Symbols – Harmonics – “< >”
Harmonics are represented by “<X>”, where “X” is the fret over which you will play that harmonic. Place your finger over the designated fret, just barely touching it. Then pluck the string. You’ll hear a natural harmonic ringing.
Natural harmonics occur on the 5th, 7th, 12th, 19th and on the 24th frets of guitars, meaning those will be the numbers you will most likely find associated with this technique.
However, artificial harmonics can also be played on other frets, so be on the lookout for that.
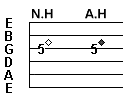
Alternatively, the initials for natural/artificial harmonic “NH” and “AH” can also be placed above the staff over the notes meant to be played with this technique.
Symbols – Tapping – “t”
Tapping is a technique made popular by guitarists such as Eddie Van Halen. Think of it as playing hammer-ons and pull-offs, but with both hands on the fretboard. You tap frets with your picking hand as opposed to using your left hand and plucking the string.
In text tablature, notes meant to be tapped display a “t” behind it.
Additionally, since many tapping licks also involve hammer-on and pull-off techniques, those notes are also accompanied by a “h” or a “p” behind them, signaling which ones are meant to be tapped or played with hammer-ons and pull-offs.
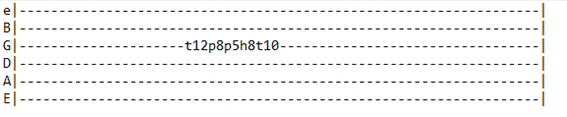
To be fair, it can get cluttered fast, which is why it is much more comfortable to read this type of technique in other tablature formats.
In an interactive tab, you can find a curved line above the notes and the same letters indicating hammer-ons and pull-offs.

Conclusion
Despite having to memorize a few things in order to make the most out of the guitar tabs you’ll find online and in music stores, they are a superb tool for learning new material, so, it is a skill you should absolutely take the time to develop and master like any other.
Remember to search for tabs from sources with a good reputation, and if they are available to you, use interactive tablature with tools like playable audio, speed control, and others we’ve discussed above.
Following this simple advice is all but guaranteed to make a positive difference in your guitar playing, so let’s start practicing!