
The world of music theory, as it applies to the guitar, is an area of study that can open up many avenues for you as a player. It can give you new directions when songwriting, serve as inspiration when improvising, and help you tremendously when communicating with other musicians.
Yet many guitarists find the topic intimidating, and will often give up after being deterred by unintuitive and poorly explained concepts. So today we hope to present an easy to digest overview of all basic music theory concepts, so you can break down that barrier that prevents so many players from becoming music theory wizards!
Contents
Basic terms overview
Pitch and musical notes
Starting right at the beginning with the fundamentals of how we make music. You are probably already familiar with the idea that most western instruments make use of 12 notes to create 99.9% of the music we listen to in the modern-day.
Pitch essentially references the rate at which a note vibrates, this can also be measured in Hz. For example, the middle C on the piano is 261hz, with the A above it being 440hz.
Humans (depending on age and genetic factors) can hear pitch from around 20hz to 20,000hz.
So why do we only use 12 out of thousands of potential pitches in our music?
As a collective of musicians, we’ve decided to use these 12 notes because of the intervals, or distance between the notes. They harmonize together well and there is an intrinsic familiarity with these notes as they are used everywhere in our culture, from pop music to movie soundtracks.
There are still plenty of instruments and musical genres out there that use more than these standard 12 notes, but they are more of a specialized topic that is best left for another time.
The notes of the guitar
It might seem obvious, but learning the notes of the fretboard is a vital part of being able to both visualize and apply the topics covered by music theory to the guitar.
Firstly, let’s go over the 12 notes that you have available to you on the guitar.
We have 7 notes which are as follows: A B C D E F G
Then in between those notes sits 5 sharps and flats as follows: A#/Bb, C#/Db, D#/Eb, F#/Gb, G#/Ab
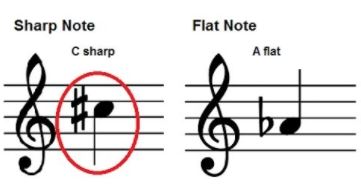
The # (or sharp) symbol indicates the note before it has been raised by 1, and the b (or flat) symbol indicates the note after it has been moved back by one. So A# and Bb are the same note and sit in between the A and B.
When we combine the 7 whole notes and the 5 sharps/flats together we get our 12 notes in order:
A A#/Bb B C C#/Db D D#/Eb E F F#/Gb G G#/Ab
Why are there no sharps/flats between B/C and E/F?
This can be a point of confusion for many new players. This note order happened because the 7 note scale came first, and the way they are laid out simply doesn’t leave enough room for a sharp or flat in between B and C or E and F.
Applying this to the guitar
Standard tuning for the guitar is (from lowest to highest strings) E A D G B E.
So playing your lowest string while not holding any frets will produce an E note, if you hold the first fret you will produce an F note.
You can follow this sequence all the way up to the 11th fret where you will reach the D#/Eb note. Then the 12th fret will be E again which we also call the ‘octave’, and you will simply cycle through the same notes in sequence again.
As you can probably guess, it can be a bit of a process to go through all 6 strings and memorize the notes. Fortunately, there are a wealth of videos on YouTube with different methods for learning the fretboard.
In addition, if you’re interested in alternate tunings, check out our guide to alternate tunings.
Guitar tablature
Tabs or tablature is the most popular way for guitarists to learn music. It’s simple, easy to read, and doesn’t require any theoretical knowledge to start learning your favorite songs. Many players never learn to read traditional music notation because of how visual, quick, and intuitive tablature is.
The catch is you need to be familiar with the song beforehand as tablature cannot quite present the same amount of detailed information that traditional music notation can. Which for many scenarios is perfectly fine.
A guitar tab will have 6 lines that represent each string of the guitar. The bottom line represents your thickest string and the highest line represents your thinnest string.
Then on top of those lines, numbers will be placed that represent the fret that needs to be played.
Here’s a quick example of a few bars of guitar tablature:
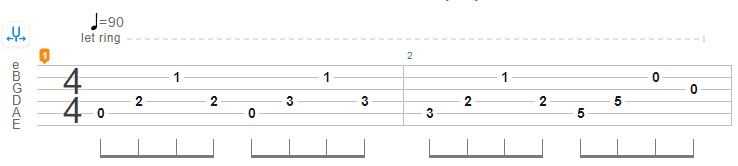
In this example, for the first four notes you will play the open note on your A string, followed by the second fret on the D string, then the first fret of the B string, and finally back to the second fret of the D string.
It’s really that simple! Various helpful indicators can be placed on tabs to give you additional information such as the ‘pm’ symbols to indicate palm muting, lines between notes to indicate slides, and ‘h’ or ‘p’ to indicate hammer-ons and pull-offs.
For a full glossary of the indicators used in tabs check out our in-depth guide to tablature.
Musical notation
This is the more traditional way of notating music. It’s great because it’s not just for the guitar but can be used for any instrument, so you will find this more commonly used in scenarios where your band/group has instruments which are not just guitars.
Here’s the same example of the tablature above but this time in music notation format:
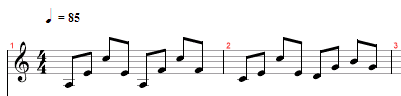
Starting on the very left hand side we the clef of which the music is written in. For guitars, we will always use the treble clef (also called the G clef) so you will usually see that symbol there.
Just to the right of that, we have the time signature which will consist of two numbers stacked on top of each other. In this case, we are using 4/4, which is also the most common time signature. This means the music has 4 beats in each measure or bar of music, and we count those 4 beats in quarter notes as follows: ONE two three four ONE two three four.
There are plenty of other time signatures out there, you might see a 3 and 4 together which you will count as ONE two three ONE two three. Particularly as you move into the more difficult or technical areas of music. But you will most commonly encounter 4/4.
Following on from that we can see lines that look quite similar to that of the guitar tab. But don’t be fooled, they are not the same! Here’s a look at the notes on the treble clef:
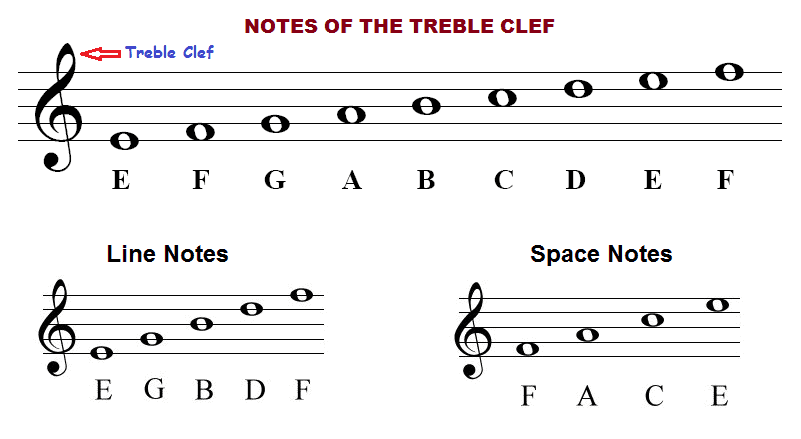
As you can see the notes on these lines are different from that of the guitar tab. A very common acronym people use to remember the notes is by separating them into the notes that sit on the line, and those that sit in between the lines.
For the notes on the lines, you can use Every Good Boy Deserves Favor, and then simply the word FACE for the others.
It’s on these lines that we will place our notes to tell the player what he or she needs to play.
But where are the sharps and flats?
You may have noticed the absence of any sharps or flats, unlike guitar tab where you can indicate this naturally with the fret number. On musical notation, you will use the sharp and flat symbols to turn that note into a sharp or flat. For example:
When we place the notes upon the treble clef, we also give the player information about the note length which is where notation can offer extra information a guitar tab cannot.
The most common note lengths are as follows:
Whole Note (also called Semibreve): Indicated by a hollow circle with no stem and means the note is held for 4 beats.
Half Note (also called a Minim): Indicated by a hollow circle with a beam and is held for 2 beats, half the length of a whole note.
Quarter Note (also called a Crotchet): Indicated by a filled circle with a stem and is held for 1 beat.
Eighth Note (also called a Quaver): Looks the same as a quarter note but has a ‘flag’ (or a squiggly line) coming from the top of the stem and is held for half a beat.
Sixteenth Note (also called a Semiquaver): Looks the same as an eighth note but has two flags coming from the stem and is held for one quarter of a beat.
Thirty-second Note (also called a Demisemiquaver): Looks the same as a sixteenth note but with three flags coming from the stem, this is held for 1/8th of a beat.
This actually continues further into 64th, 128th notes, and so on!
With all this information together on the clef, a guitarist is given all the information they need to be able to play a piece of music, even if they have never heard the track before!
A primer on scales

With the knowledge that we have 12 musical notes to play with to make our music, how do we go about doing that without taking shots in the dark and hoping we stumble upon something good?
This is where scales come in.
Scales are a sequence of notes that, when played, present a particular mood, vibe, feel, or atmosphere.
We can use our knowledge of scales to help give us direction when it comes to songwriting, or when playing with other musicians. For example, if I want to write a happy song I might use my knowledge of scales and choose to write in the major scale, or if I feel like writing a sad song I might head to the minor scale first.
This is a key concept to grasp, it’s not just memorizing notes, it’s about gaining the ability to create different feelings and emotions on the instrument.
Here’s a very quick rundown of some common scales that you might want to look into:
Major Scale: Also called the Ionian mode, generally presents a happy and upbeat feel, works great for pop songs. All the common modes are derived from the major scale so it’s worth learning this one fairly in depth!
Minor Scale: Also called the Aeolian mode or 6th mode of the Major scale, useful for sad, solemn, or mysterious songs.
Major/Minor Pentatonic: Most common scales have 7 notes in them, also referred to as diatonic scales. Pentatonic scales are similar to their major/minor equivalents but instead have 2 notes removed making them 5 note scales. This makes them easy to learn and are extremely common in rock and guitar soloing.
Harmonic Minor: Achieved by simply raising the seventh note of a regular minor scale creating a minor third interval, this one has a very Eastern sounding vibe to it. Used commonly in metal music and movie soundtracks.
Melodic Minor: The same as harmonic minor but this time we also raise the 6th note and is often interchanged with the harmonic and natural minor scales mid-song for a bit of intrigue.
Chromatic: This is a 12 note scale that uses every single note on the guitar, seldom used as a main songwriting scale, but when peppered in during guitar solos and riffs it can sound incredible.
An introduction to modes
Modes are simply a way to re-order the notes of a scale to achieve a different sound. For example, if the 7 notes of the major scale are as follows: 1 2 3 4 5 6 7, this gives us the interval sequence of W W H W W W H (with W being a whole step or 2 frets, and H being a half step or 1 fret).
What happens if we were to start on the 2 instead of the 1? We would get this: 2 3 4 5 6 7 1, which then changes our interval sequence to W H W W W H W, therefore changing its feel and vibe.
We refer to this idea of starting on the second note of the major scale as being the second ‘mode’ of the major scale, or the Dorian Scale.
You can continue this process through every note of the major scale, and as there are 7 notes in the scale there are 7 modes of the major scale we can make which are as follows:

Here’s are some brief descriptions to give you a quick idea of what each mode sounds like:
Mode 1, Ionian, aka the major scale: Generally happy and upbeat sounding, very common in pop music.
Mode 2, Dorian: Close to the minor scale but with a little bit less sadness to it, very common in rock, blues, and even metal.
Mode 3, Phrygian: A darker sounding scale, has more of an Eastern flair to it.
Mode 4, Lydian: Mysterious sounding, popular amongst guitarists like Steve Vai.
Mode 5, Mixolydian: Similar to the major scale with the 7th note lowered giving it a different feel.
Mode 6, Aeolian aka the natural minor scale: Generally seen as being sad sounding, can also be powerful and is commonly used in rock, blues, and movie soundtracks.
Mode 7: Locrian: A less commonly used scale and is often described as feeling ‘unresolved’.
The process of memorizing and understanding scales and modes is a big undertaking and not something you will pick up in a few days. We have a fantastic guide to scales here that will help you more in-depth through this journey of understanding and memorizing scales:
Introduction to Chords
When you play two notes at the same time, you get an interval. When you play three (or more) notes at the same time you get a chord.
There are a tremendous amount of chords that you can make on the guitar with just having access to 6 notes at a time. So where does one begin?
Triad construction
Triads are three note chords and are the first place anyone should start when entering the world of chords. They are three note chords and form the fundamental basis on what a lot of modern pop music is built upon. Let’s go over the most common types of triads and how to make them.
Major chords
To create a triad we use a formula that includes the root note of the chord, and then 2 additional notes built up from that root to give us our triad.
So for example, to create a major chord we take the 1st note of the scale, the 3rd note, and the 5th note. In terms of intervals, we can describe it as the root note, the major third, and the perfect fifth. Sometimes we use a numerical formula to speed this process up.
Let’s apply this to C and create a C major chord:
The 1st, 3rd and 5th notes of the C major scale are C E G. C being the root note, E being a major third up from the C, and G being a perfect fifth above the C.
This 1 3 5 or root, major third, perfect fifth formula can be applied to any musical note you want to turn it into a major triad.
Minor chords
Much in the same way we would when constructing major triads, we will still use a formula but instead of a major third, we will change it to a minor third. This gives us 1 b3 5, or root, minor third, and a perfect fifth.
Let’s apply this to C again and instead create a C minor triad:
Using C as our root note, a minor third above that is E flat, and the perfect fifth above C is G giving us the notes C, Eb, and G.
So to recap, the major triad formula is 1 3 5 and the minor triad formula is 1 3b 5.
These are the two most common triads you will encounter, but there are still 2 common types of triads left to cover.
Diminished chords
The formula for the diminished chord is 1, b3, and b5. In intervals that is the root note, a minor third, and then a flattened 5th on the top. Another way to think of it is stacking two minor thirds on top of each other.
So for example, making the C diminished chord we would have a C root note, the Eb again as the minor third above that, but instead of the G like a minor chord, we then flatten that to Gb.
Augmented chords
To make the more unusual sounding augmented chord, we can simply take the major triad formula which is root, major third, and perfect fifth, and we sharpen or ‘augment’ the fifth by raising it up one note.
The formula for this is 1, 3, and 5#.
Which, if we apply to C again would be C as the root note, the E as the major third above that, and this time we take the G which would be a perfect fifth, and sharpen it to G# giving us the notes C E G#.
Chord inversions
One of the simplest and most effective ways to start expanding beyond just regular triads is with chord inversions.
Inverting a chord is the process of rearranging the notes of the chord in a different order. So while it musically still functions as the same chord utilizing the exact same notes, putting something that was originally the lowest note on the top can give it a different feel without fundamentally changing the chord.
Let’s look at a few examples:
If we take the C major triad which contains the notes C E and G. C is the lowest note, followed by the E with G being the highest. If we were to take that C and place it on the top, giving us E G, and C we would have what we call the C major first inversion.
Likewise, if we were to take that first inversion, E G and C, and now take the E and place it as the top note, we would have the notes G C and E which we would call the second inversion.
This can be applied to any chord, even if it has more than 3 notes in it. The purpose is not to change the tonality of the chord or its place in a progression, it’s just to explore sounds and spice the music up.
Suspended Chords
Suspended chords are called as such because they don’t have the major or minor third in them like your common triads. That third plays a big factor in setting the tonality of the chord and placing it in major or minor sounding territory.
Without that third, the chord has the feeling of hanging or being ‘suspended’.
There are two commonly used kinds of suspended chords which are the Sus2 and Sus4. This gives us the formulas 1 2 5 or 1 4 5.
Let’s apply this to C to make the Csus2 and Csus4 chords.
To make the sus2 we take the root note C, and instead of playing the major third, we instead move that note to the second which in this case is D, and finally, we have the perfect fifth as G giving us the notes C D G.
Likewise, with the sus4, we play C again, and then move the major third up to the perfect fourth which in this case is F, and then play the fifth which is G giving us the notes C F G.
So what’s next?
Obviously, triads are just your main starting point and the world of chords is deep enough to write entire books on. You can have 4, 5, 6 note chords that use many other intervals such as the 7th, 9th, 11th. Once you have these basics mastered we encourage you to go further into this world and explore some more elaborate chords.
Barre chords
Barre chords are named as such because you will often use a single finger (usually your index finger) to ‘barre’ across all the strings. This allows you to create a chord shape that is ‘transposable’. That is to say, it can be moved up and down the fretboard to create different chords.
Let’s look at an example.
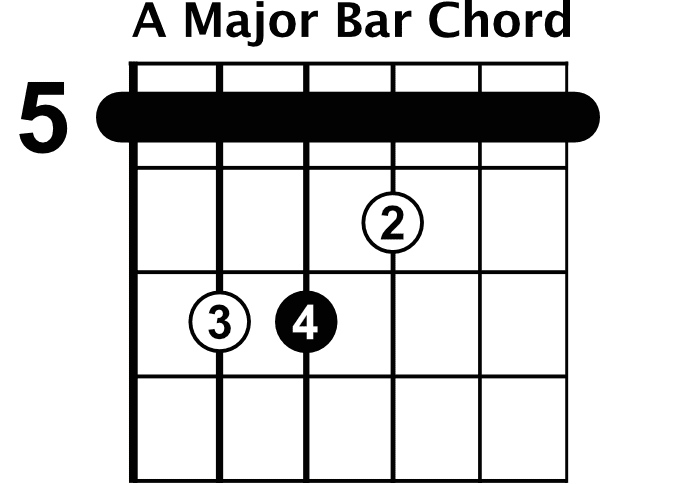
To make the A major barre chord shape, we just have to lay our index finger across the entire fretboard on the 5th fret, so our lowest note is the A. We give this barred finger its major tonality by using our ring finger on the 7th fret of the second string, our pinky on the 7th fret of the third string, and finally our middle finger on the 6th fret of the fourth string.
If we were to then continue holding this shape but move the entire thing up 2 frets, we would instead be playing a B major chord, and if we then moved that up 1 more fret we’d have C major, and so on.
There is a music theory system called the ‘CAGED system’ which will introduce you to ALL of the most common barre chord shapes which are transposable in the exact same way we have shown.
Another area to investigate is how guitar chord families are formed using harmonic function.
Rhythm
Rhythm is one of the most important aspects of music theory but is one that seldom gets discussed. Fundamentally it is the placement of sound on time, it’s what makes music groove and give it its personality.
One of the best ways to improve your rhythm is by learning popular songs that have strummed chords in them. These songs rely heavily on different combinations of upstrokes and downstrokes in tandem with pauses or held chords to create all manner of rhythms. Learning these and increasing your rhythmic vocabulary on the guitar will serve you greatly as a musician.
Circle of Fifths
The circle of fifths is a way to visualize different chords and their relationship to each other.
It can be used as creative inspiration as we write music or improvise to give us an idea of places we can go that are a little bit more ‘out there’ than just being limited to chords that exist within your chosen scale.
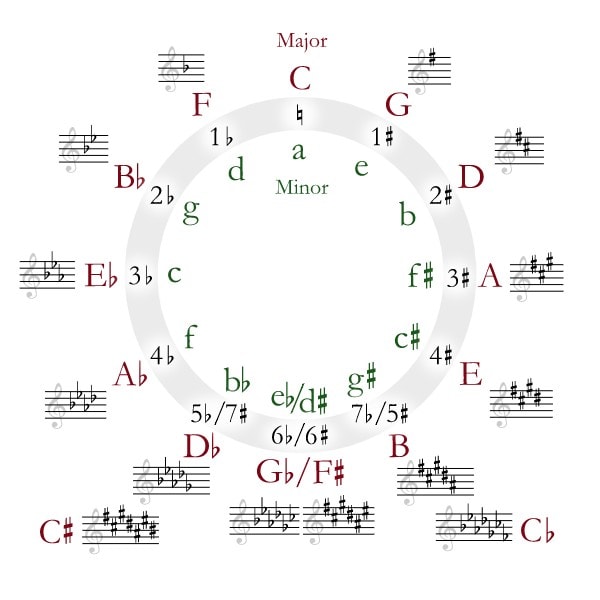
Around the outside, we have major scales and inside we have their relative minor equivalents. So let’s say we are in C major and have played the C major chord, the notes on either side of it, in this case, G and F have the most notes in common with C. So we consider them ‘safe’ chords to change to, or safe keys to modulate to. As we travel further around the circle there will be progressively more notes that are different from the key you are currently playing, making them more unusual or jarring to suddenly jump to.
When using the circle of fifths there are no rules to dictate which chord is right or wrong, it’s just informative data we can use to give us ideas and inspiration when writing.
Musical structures in pop and classical music
Depending on what style and genre of music you find yourself attracted to, you may need to familiarize yourself with how music is structured.
When it comes to something like pop music, there is a certain structure that will be used in almost every song which is that of the verse, chorus, verse, chorus arrangement. The verse is a section of music that has new lyrics each time it repeats, whereas the chorus will have a repeating hook that you revisit multiple times a song.
But with classical music, there are alternate and interesting musical structures that often utilize longer passages of music. Here are a few of the most common ones.
The arch form which cycles through a number of ideas (often referred to by letters, for example A B C) and then repeats them but in reverse order, an example song structure being A B C D C B A.
There is also the Rondo form which is arranged such as A B A C A D, etc.
Melody
Melodies are essentially single notes that we play and arrange in an order that uses pitch and rhythm to create a memorable or satisfying tune that complements the intention or feel of the song.
This doesn’t mean a melody always has to sound happy and catchy. If you are using a darker sounding scale such as Phrygian, a good melody might sound ominous or unsettling.
It’s the thing that will stick in the listeners head and make them want to hum it in the shower
The root note and key
The key or root note of a piece of music is something you will see crop up very often. It plays into almost all aspects of music from the scales we use, how we construct chords, as well as a central point when communicating with other musicians so you can easily write together.
In the simplest way, the key of the song is the foundation note of the scale. So if we were to use the notes C D E F G A, we are playing in the key of C major and C is our root note.
This is easy enough if you are the songwriter and deciding on the key of the song is the first thing you do, but figuring out the key of the song can be quite challenging.
Tempo
Every piece of music will be played at a particular tempo, we usually measure this in BPM or beats per minute. It essentially dictates the speed of the song and if you are learning from sheet music or tablature the tempo will usually be indicated at the top of the sheet.
In the world of popular music, we will often have just a single tempo throughout the song.
But this becomes a bit more complicated when we move into classical music as there is a large vocabulary list that is used to describe all manner of tempo changes that allow the player to make more subtle tempo changes.
Here are some of the most common ones you’ll encounter:
- Adagio: Slow and with great expression (66-75bpm)
- Moderato: At a moderate speed (108-120bpm)
- Allegro: Fast, quick, and bright (120-156bpm)
- Presto: Very, very fast (168-200)
Texture
Texture is a term we use to describe the overall sound of a piece, it’s where many factors such as the tempo, the melody, how it is harmonized, the tones of the instruments used, and what range they sit in all combine to give a final ‘feeling’ to the music.
Easy examples are a solo violin playing a sparse melody without many notes could be described as having a thin texture.
Yet a dense orchestral arrangement with many different instruments that take on the roles of bass, mids, and highs can be described as having a dense or thick texture.
Timbre and dynamics
When we talk about timbre specifically we often will use words like the ‘tonal color’ or ‘quality’ of the sound. There are many factors that play into the overall character of the tone to provide its timbre, this can include its attack if it’s noisy and rich in harmonics such as a distorted guitar or completely clean and clear like a grand piano.
Likewise with dynamics, as we play harder or softer, sustain the note or cut it short, these are playing with the dynamics of the instrument and play into its overall texture.
On many pieces of music, there will be instructions given to the player requiring them to manipulate the dynamics of their instrument to best suit the song.
Final thoughts
While we have touched on each of the main topics involved with music theory and given a brief overview of them. These subjects do of course go much deeper and there is a wealth of knowledge and insight to be gained by studying them further.
We hope this overview will serve you as a nice introduction to the world of music theory.