
Guitar action means the distance between the strings and the fretboard. When you have a high action, meaning a lot of distance, you have to apply more pressure with your fingers to get a note to ring clearly. If the string is naturally very close to the fretboard (low action), it is much easier to fret a note. But at the same time, you can induce fret buzz and misplayed notes more easily.
We’re going to walk you through everything you need to know about action in this article, including how to diagnose and fix any action issues you might encounter. But if you’re in a hurry, here are some of the key takeaways from this article.
- Guitar action can be adjusted at the bridge, the nut or with the truss rod.
- Low action on an electric is 1.00mm on the high E and for an acoustic is 1.5mm on the high E.
- High action on an electric is 1.65mm on the high E and for an acoustic is 2.3mm on the high E.
- Action goes hand-in-hand with intonation, so you need to find balance between both.
- Contrary to popular belief, you can get low action on an acoustic guitar.
Contents
What is Action on a Guitar?
Action on a guitar is basically the distance between the strings and the frets on the fretboard. This is part of what makes a guitar play the way it does. A larger distance between the frets and the strings generally means a guitar is harder to play. There are conceivably exceptions to this, but we’re going to keep it relatively simple here.
High action means your fingers have to push the string down a greater distance for it to touch the fret and create a note. Lower action makes it easier to play faster passages and makes things like hammer-ons and slides easier to play.
Generally, higher action will sound better. This may seem strange at first, but it makes a lot of sense if you think about it. A string doesn’t just vibrate, it rotates along its own axis between the bridge and the nut (kind of like how a skip rope works). And when there’s more space for the string to move, the more rotations it gets, which increases note clarity and sustain.
Getting the action too low means the strings are too close to the frets, which means a string can touch the frets too much while vibrating, causing a nasty buzzing sound. This is what we call fret-buzz (not to be confused with string noise from playing). Unfortunately, this is something that plagues all electric guitars in one way or another. Unless your strings are so high off the fretboard that you can stick another guitar in between, you’ll always have fret buzz to some degree. This usually occurs in the higher frets, where the length of the string is very short and there’s less space for the string to vibrate.
Luckily, if the fret buzz is mild enough it won’t translate through the pickups, meaning you’ll hear it acoustically, but not amplified. This doesn’t mean that it won’t be audible at all if the buzz is too strong.
There’s a certain point at which the buzz is so strong it overpowers the vibration of the string, causing dead notes. This is often in conjunction with uneven frets, and is a problem that plagues almost all lower-end guitars.
Therefore, to make the guitar play and sound the best it possibly can, you’ll need to have leveled frets, which offer a healthy balance between natural fret buzz and low action.
Most guitarists like their action to be as low as possible, which is what we’re focusing on in this article. As with everything guitar-related, everything we say about playability and sound is relative. Every player has different likes and dislikes. So keep on reading to learn everything you need to know about action.
How to Measure Guitar Action
Step one to finding the optimal action for your guitar is to measure your current action. This can be done a couple of ways.
Method One: Specialized Guitar Ruler
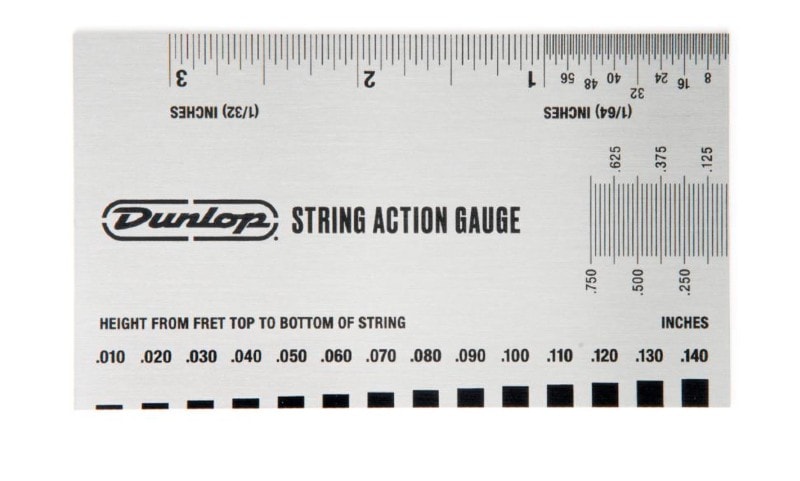
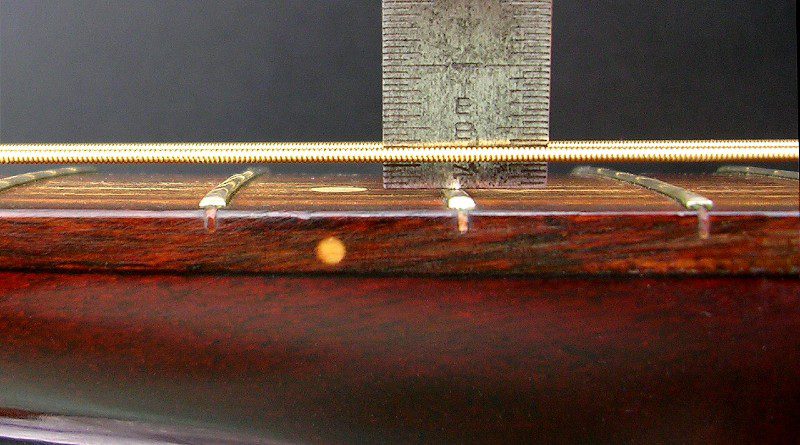
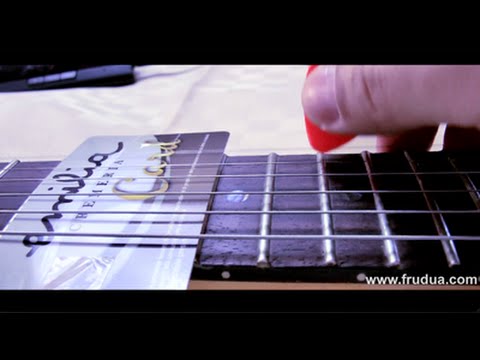
A ruler specifically designed for guitars is something all luthiers should have in their arsenal, and is something every guitarist should own. There are many options out there in all price ranges, but they all basically boil down to the same thing, a ruler. Most guitar rulers will have measurements in both inches and centimeters. For guitars, the metric system is often preferred because it’s easier to make small and precise measurements, and it’s easier to calculate. Guitar rulers often have little black squares on them that are of different sizes (see photo). These are used to measure action.
What you do is put the long side of the ruler upright on the frets (perpendicular to the fretboard, and parallel to the strings). Then you measure from the top of the fret to the bottom of the string. This will give you an accurate measurement of the action.
These rulers are very cheap and easy to find. Some of our favorites are the Jim Dunlop Action Gauge System, the MusicNomad Precision Action Gauge Ruler, or if you want something a little more advanced, the FretGuru Precision Setup and Evaluation Gauge.
Method Two: Feeler Gauge
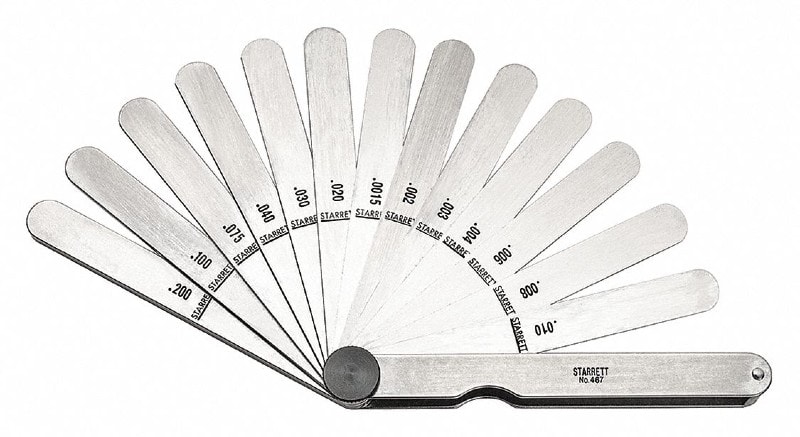
If rulers aren’t your thing, or if there’s none available, you can also use a feeler gauge. A feeler gauge is basically a set of thin steel plates in a range of thickness. These gauges are also used for taking other measurements, like nut slot width or neck relief.
You use it by putting different feelers between the fret and the string one at a time, and checking if both the string and the fret touches it, without pushing the string up. If you have trouble reading small numbers, this will be an easier way of measuring guitar action than using a ruler.
We recommend getting both a ruler and a set of feeler gauges, as both might be necessary for getting the optimal action for your guitar.
Feeler gauges are easy to find on Amazon or at hardware stores, and you can either go for a standalone set or for not much more, get a bundle that includes a feeler gauge, a ruler, and a few other luthier tools.
Method 3: DIY Hacks
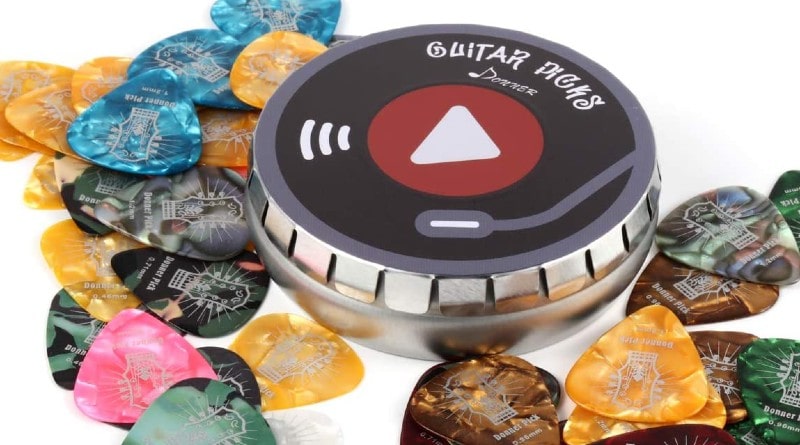
What if you’re not able, or don’t want, to spend money on specialist tools? Or if you need to make adjustments and don’t have time to go out and get tools? Fortunately, there are some “hacks” that make use of items you already have laying around at home.
The only things you’ll need are some picks of different sizes and some string clippings.
You can use the picks like feeler gauges, and the strings as more accurate feeler gauges. As long as you know what thickness the string is, you’ve got yourself a makeshift gauge.
If you can’t get the exact measurements, don’t be afraid to get crafty and stack the picks and strings to get the right size. You can even use pieces of paper, as long as you know the thickness, which is usually right there on the packaging.
Deciding on Your Ideal Action
Whilst getting a super low action might play great, it’s not always the best option. You have to find a healthy balance between feel and tone. Higher action generally means better tone. Lower action generally means better playability.
If you want to figure out your ideal action, you’ll probably have to do this through trial and error. Testing out things is the best way to find out what works for you. But before spending hours and hours trying to find the right action, you’ll want to think about your needs.
Different playing styles often ‘require’ different actions. Blues players who play very rhythmically with lots of strumming will probably be better off with a higher action than Yngwie-style shredders.
Ideal Action for an Electric Guitar
Fender recommends 1.6mm (4/64”) on the bass side, and 1.6mm on the treble side. This is higher than Ibanez’s recommended action of 1.6mm on the bass side, and 1.5mm (1/16”) on the treble side. This difference might be small, but it’s absolutely noticeable when playing.
Despite manufacturer recommendations, shredders will often bring it down to 1mm (3/64”) on the treble strings.
This is obviously based on preference, and there are tons of shredders out there who play with a higher action, but low action seems to be the ‘standard’ for shredders.
Another thing you’ll have to look at is the gauge of string you’re using. People tend to believe that thinner strings can achieve a lower action, but the opposite is actually true. Thinner strings have more slack, which means they move more when plucked. This can cause more buzzing. Thicker (and therefore tighter) strings will move less, allowing you to bring them a little closer to the fretboard without the notes going dead.
| mm | Electric | Electric | Acoustic | Acoustic |
|---|---|---|---|---|
| Action | Low E | High E | Low E | High E |
| Low | 1.25 | 1.00 | 1.75 | 1.50 |
| Low-Med | 1.50 | 1.25 | 2.00 | 1.75 |
| Medium | 1.65 | 1.40 | 2.30 | 1.90 |
| Med-Hi | 1.75 | 1.50 | 2.50 | 2.15 |
| High | 1.90 | 1.65 | 2.80 | 2.30 |
Ideal Action for an Acoustic Guitar
Acoustic guitars tend to have higher action than electrics. This is intentional, as it benefits the sound of the instrument. I mentioned that fret buzz on electric guitars won’t always be audible when amplified, which obviously is irrelevant for unplugged acoustics.
Martin Guitars set up their guitars with relatively high action and thicker strings (.12 gauge), while Taylors tend to come with thinner strings (.11/.10) and lower action.
As with electric guitars, a balance has to be found between sound and playability. Acoustic guitars are notorious for being generally harder to play than electric guitars, and this is typically attributable to high action.
Making an acoustic guitar play like an electric guitar is doable, but you’ll almost certainly be sacrificing tone in some way. This doesn’t mean it’s impossible though.
Ideal Action for a Classical Guitar
The same rule applies to classical guitars, except for a few things. Classical guitars are designed for a totally different playing style than acoustic guitars. Whereas acoustic guitars are generally built for strumming and picking, classical guitars are meant as both a rhythm and lead instrument. This means the guitar has to be more easily playable than an acoustic guitar.
One of the ways this could be achieved is with low action, but it might sacrifice tone. And since the sound of a classical guitar is a lot warmer and ‘weaker’ than an acoustic guitar, there isn’t a lot of wiggle room regarding sacrificing sound (and volume!). Another way in which playability can be optimized is through the strings.
Classical guitar strings are a lot lighter than steel strings and are easier to fret. This makes it so a low action isn’t even necessary in most cases. Well-setup classical guitars are extremely playable, even with high action.
Adjusting Your Guitar’s Action
Adjusting the action is usually done one (or more) of three ways: adjusting the bridge, adjusting the nut, or adjusting the neck relief.
The easiest way to adjust the action is usually at the bridge. Which often just means getting a screwdriver and some sandpaper to do the heavy lifting.
Adjusting the nut is a little trickier, as it usually requires permanent modifications that have to be done well and with caution, as having to replace a badly cut nut can be a pain.
The most drastic way of adjusting the action is by adjusting the neck relief. Neck relief basically means the amount of bow the neck has. Most guitar necks have a truss rod, which is a steel rod that gives the neck its bow (read about truss rods here). Most guitar necks aren’t perfectly straight by design, but if the neck bows too much one way or the other, it can cause problems with the action.
How to Adjust the Action on a Classical Guitar
Adjusting the action on a classical guitar can be done one of two ways. You can lower the bridge or the nut. Many classical guitars don’t come with truss rods, as the string tension tends to be pretty low on these guitars.
Lowering the action at the bridge is easiest. Take out the saddle from the bridge. This is usually loose already and can just be removed by hand. If it’s glued in place, you can use a hammer to gently tap it out from one side.
Once you’ve removed the saddle, mark the bottom with a sharpie. Then, put a piece of sandpaper on a flat surface and sand down the bottom of the bridge. You can see by the amount of sharpie on the bottom if you’re sanding it down even.
Go very slow and regularly check to see if it’s alright. Always test if the notes don’t buzz at any frets. If audible buzz occurs, you’ve gone too far.
Raising the action (or fixing an action that’s now too low) is very simple. Just stack thin narrow strips of paper below the bridge. Make sure everything is pressed tightly against each other, as the saddle needs to be able to resonate well to get a good sound and proper sustain.
The same can be done with the nut, but doing the bridge is best, as nuts are more precisely cut and can be hard to replace if something goes wrong. DIY-ing a saddle is easy enough, but trying to cut a nut yourself can be very challenging and require certain tools which can be very expensive.
The downside of adjusting the action on a classical guitar is that you can’t effectively adjust the intonation, so don’t go too extreme with adjusting your action or you run the risk of bad intonation. For more on understanding and adjusting intonation, check out our full guide here.
How to Adjust the Action on an Acoustic Guitar
Adjusting the action on an acoustic guitar is a very similar process as a classical guitar. But the main difference is that acoustic guitars usually have a truss rod.
Checking the truss rod is step one to adjusting your action in this case. Look down the neck at the headstock and see how much it bows. If it slightly bows away from the strings, it’s perfect. If it bows too much or too little, you’ll have to adjust the truss rod.
This can be done by unscrewing the truss rod cover on the headstock and using the appropriate size Allen key to turn it one way or another (depending on which way you want to adjust it). Go in quarter turns and wait a couple hours between quarter turns, as it takes some time for the neck to properly set. Retune and check it again.
If that’s not enough to adjust the action to where you like it, follow the same steps as for classical guitar.
How to Adjust the Action on an Electric Guitar
There’s a few different types of bridges, which are all set up in a different way.
The Tune-o-matic bridge
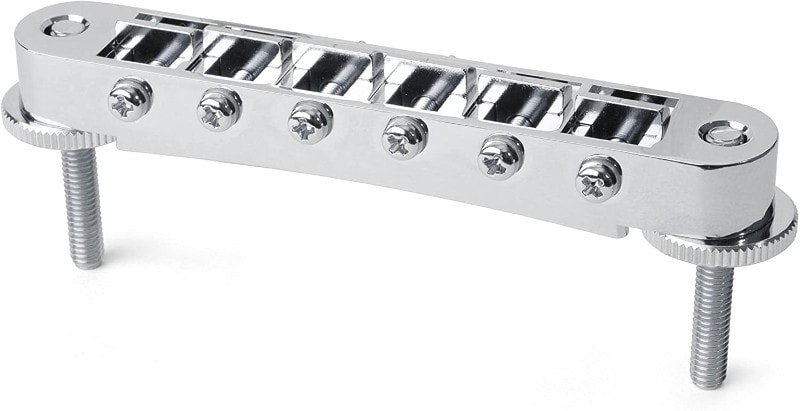
This type of bridge is what we call a ‘hardtail’ bridge, which means the bridge is not intended to remove and is generally easiest to maintain. Gibson style (Les Pauls, Flying V’s, Explorer etc.) guitars often come with Tune-o-matic style bridges.
Tune-o-matic bridges consist of two parts, the saddle, and the stoptail. The saddle is where the strings touch the bridge, and this is where you’ll do your adjustments. The stoptail is just there to hold the strings. Some Tune-o-matic bridges don’t have the stoptail, in which case the strings usually go through the body and come out one the other side.
The way you adjust the action on a Tune-o-matic is very simple. Tune-o-matic saddles have two pole pieces, one on either side. You can raise or lower them with a flathead screwdriver. Don’t mistake these with the pole pieces on the stoptail, as this won’t affect your action in any way.
Hardtail Bridge
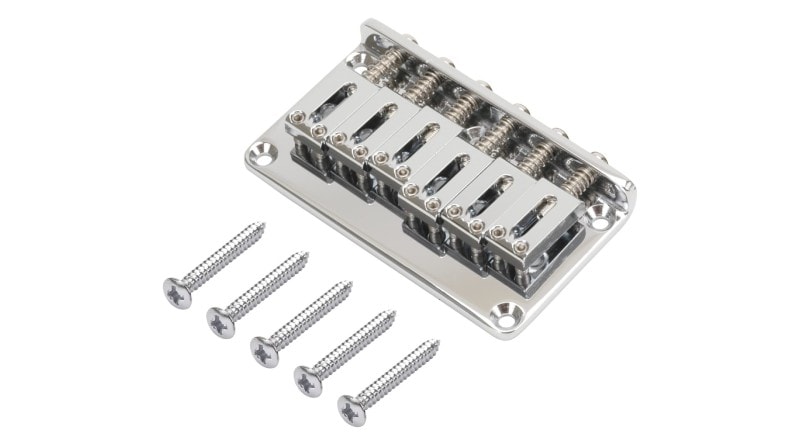
Besides the Tune-o-matic, there are other hardtail bridges. Most hardtail bridges that are not Tune-o-matic look roughly like some bridges in the images below. These bridges are usually either string-thru or top-loading. String-thru bridges include holes that are drilled through the body, through which you run the strings. Top-loading means the strings are blocked by the bridge itself, and these do not include holes that go through the body.
Adjusting these is very simple and very precise. On these types of bridges, you can usually set the action of each individual string, which is nice and precise, but it takes a little more time. You adjust the action by using a small Allen key. On some hardtail bridges, you have two screws per string, so you’ll have to make sure they stay flush. Otherwise your bridge won’t be even, which can compromise tuning stability.
Fender-Style Vibrato Bridge
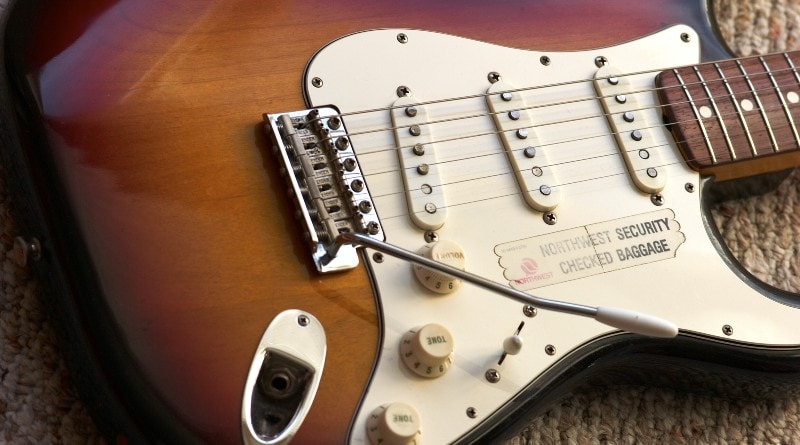
Besides hardtails, you’ve also got tremolo bridges. Tremolo bridges allow the player to manipulate the tension (and thus pitch) of the strings. Fender-style tremolos usually only move down, in contrast to Floyd-Rose style bridges, which can move in both directions.
Adjusting these is very similar to the hardtail bridges, in which you adjust every single string’s action separately. If you’ve got an Ibanez-style tremolo, you’ll usually have to adjust the bridge at its pole pieces, similar to the Tune-o-matic.
Floyd Rose Style Bridges
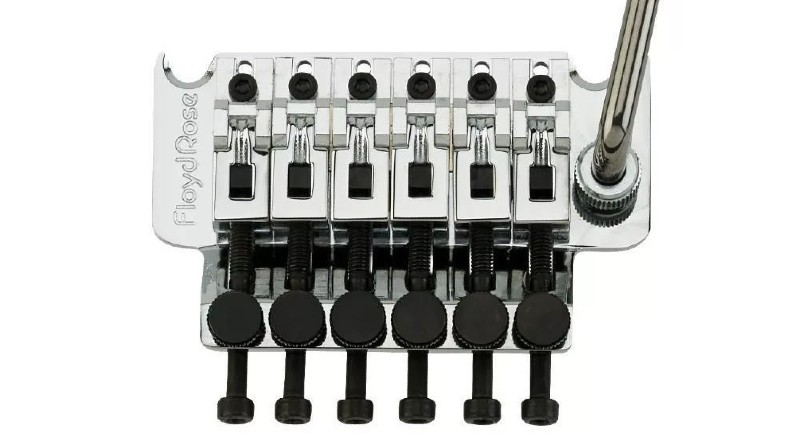
Floyd Rose bridges are what we call double-locking tremolos. This means the string is locked in two places, at the bridge and at the nut. This makes the tuning stability incredibly solid, while still giving it the ability to move. Floyd Rose style bridges are the most finicky of the different types of bridges. As everyone knows, a Floyd Rose type bridge has to be set up well in order to be playable.
Floyd Rose style bridges can move up and down, which allow crazy cool effects like pinch squeals and divebombs. These bridges are very much loved as well as hated. Common complaints include that they’re hard to set up, and that string changes take a lot longer (some people even hardtail them to avoid this). Some of the common praises include tuning stability (Tuning a Floyd Rose takes a while, but it will stay in tune for a LONG time, making it great for using live), and the ability to make some very interesting sounds. These guitars are therefore very popular among lead guitarists.
Adjusting the action on a Floyd Rose style bridge is done by adjusting the pole pieces, just like on a Tune-o-matic. Surprisingly simple for such a complicated system.
There are many different versions of the Floyd Rose bridge, including the various licensed bridges, as well as the Ibanez Edge tremolo. All these bridges basically come down to the same thing and are very similar in the way they are adjusted.
Other Tremolos
Other examples of tremolo’s include the Kahler (double-locking tremolo) and the Bigsby (subtle tremolo, otherwise dubbed ‘vibrato’).
The Kahler’s action is adjusted per string, with a single screw determining the height of a particular string. The main difference between a Kahler and the Floyd Rose is that the Kahler is self-contained, which means it all fits into a single case. The Floyd Rose requires a large amount of wood to be removed for the unit to fit. Some of the cons of Kahler bridges include the fact that they’re less solid in regards to tuning than a Floyd Rose.
The Bigsby bridge usually comes on guitars that are jazz-oriented, and are a lot more subtle than a regular tremolo. They only move down, and not very far. These bridges were not designed for crazy effects, but for subtle movements. The Bigsby vibrato is a little different from the other tremeloes, as the saddles don’t actually move. The part that moves is behind the bridge. This means the action can be adjusted like a regular hardtail.
Frequently Asked Questions
Why Did My Action Change without Me Changing Anything?
This can happen for a few reasons. The most common is changes in temperature and humidity. Guitars are mostly wood, and wood changes size pretty drastically. The stronger the difference in humidity or temperature between two locations, the more the wood will move. This movement can cause the neck to bow more or less than it did before. In more extreme cases, it could be the metal that made the difference. Metal changes size similar to wood, but less drastically.
Another reason the action might have changed is because you changed string gauges. The thickness of a string determines how much tension it pulls. Thicker strings hold more tension and can make the neck bow more than it did. The same holds true for lighter strings, except it lessens the amount of tension, making the neck bow less. Guitar strings generally have more than 100 pounds of pull, which means that the strings pull on the neck and body with quite a string force. If the amount of tension changes, this force changes, which makes the guitar move.
What Tools Do I Need to Change My Guitar’s Action?
The tools you’ll need are specific to which type of instrument you’re trying to adjust. For acoustic guitars, you might need tools like sandpaper and hammers. For electric guitars, a set of screwdrivers and Allen keys should be all you need. We recommend investing in a guitar toolkit. Many companies make these kits, including Ernie Ball, d’Addario and Fender. These kits usually clock in at less than $50 and are a very worthwhile investment for any guitar player. They often include the appropriate tools, like pliers, Allen keys, and different rulers and feeler gauges, as well as micro-fiber cloths and polishing aids.
Why Do Cheap Guitars Have High Action?
This is very common and it can happen for a multitude of reasons. The most common reason is that these guitars are poorly set up. These guitars are cheap because they include cheap parts, and the manufacturers tend to have more relaxed quality control, which means not every guitar is set up with a lot of attention.
Another reason the action is high is because it can’t be any lower. This can happen because of uneven frets. Uneven frets can make the strings buzz more, which means you can’t bring the strings closer to the fretboard without the notes buzzing out very fast.
Another potential cause could be the wood is warped. This can cause the same problem we described above, where the frets become uneven and cause a lot of buzz.
Does Higher Action Have Better Tone?
The short answer is yes. This happens because the strings have more space to resonate, which increases fullness and sustain. That’s the entire reason acoustic and classical guitars (which have a naturally ‘weaker’ tone than electric guitars) generally have high action. This causes the dilemma in which you have to decide if you want better playability or a better tone. A balance has to be found within these two parameters, which can be an entire artform in itself. Getting the perfect balance takes some practice, as well as knowledge of the instrument in your hands. So, does a high action improve tone? Yes, absolutely.
Can Acoustic Guitars Have Low Action?
Every guitar can have low action, but the question is if you want that or not. A balance has to be found between playability and tone. Having low action (and thus less sustain and ‘body’) is more manageable on an electric guitar, as it goes through an amp, speaker, and maybe some pedals. But with an acoustic guitar, there’s not much you can do in terms of tone. If an acoustic guitar doesn’t sound good with low action, there is no real way to improve that, other than raising the action.
Some acoustic guitars can handle low action. Unfortunately, these guitars are generally pretty expensive, as they have to be built very well to sound good and have low action. Martin Guitars are known for making guitars with very low action, as well as guitars with higher action. Martin Jr. guitars are a good option for players who want a very playable guitar that sounds good at a slightly more budget-friendly price. Most of these guitars are still $500+, but you absolutely get something very good for a good price.
Final Thoughts on Guitar Action
Adjusting the height of your guitar’s action to suit your style of playing can completely transform how you experience the instrument. When done right, this can provide a boost to your playing ability, too. The key is to make any adjustments methodically and to take measurements before and after. You can easily find yourself in a world of intonation troubles and worse if you make incorrect adjustments! If you’re not confident in making your own adjustments, take your guitar to an experienced guitar tech or luthier and tell them how you’d like your action.
Main image courtesy of Patrick Despoix via Wikimedia