Locking tuners have genuinely revolutionized guitar maintenance, offering up a rare blend of both reliability and convenience. These tuners, unlike traditional ones, feature a locking mechanism on the back of the tuning peg which clamps down on the string to prevent it from slipping and dropping out of tune.
If you’ve recently added these tuners to your guitar, or you’ve just bought a guitar that had them equipped as standard – congratulations! You’ve made a serious upgrade to your guitar’s playability and tuning stability which you’ll almost certainly benefit from immediately.
For players who have never owned anything with locking tuners before, the restringing process looks a bit different, but don’t worry, it’s generally even more straight forward than restringing a guitar with standard tuners!
In this KillerGuitarRigs Guide you’ll be learning more about what locking tuners do, how they work, and how to restring a guitar with these tuners.
Contents
- What are Locking Tuners?
- Benefits of Locking Tuners
- How To Restring a Guitar with Locking Tuners
- Troubleshooting Common Issues
- FAQs
- How often should I change my strings with locking tuners?
- How do I know if my tuners locking mechanism is properly engaged?
- Will they affect the tone of my guitar?
- Is it difficult to install a locking set of tuners?
- Can they be used on any guitar?
- How do I maintain my locking tuners?
- Do they work well with tremolo systems?
- Final Thoughts
What are Locking Tuners?
Locking tuners are a special type of tuning machine for guitars that keep your strings secured to the guitar without the need for multiple winds around a tuning post as with a traditional machine head.
There are many different tuner manufacturers, meaning not all are created equal. One thing they all have in common, however, is decreased restringing time, and increased tuning stability.
In the majority of cases, these tuners don’t look much, if at all different from standard tuners. In fact, you can get Grover models, Fender vintage models, and many others that are designed to look exactly like stock non-locking machines. This way the look of your guitar remains unchanged, but you’ll get the benefits associated with this style of tuner.
Standard tuners rely on multiple wraps around the tuning posts for securing the string. This is a tried and tested way of installing a string, but nonetheless, it’s an inherently flawed way. All of those wraps around the post leave room for slippage, so with every bend, and every tremolo movement, you’re pulling slack out of those wraps, and pulling the string out of tune.
Benefits of Locking Tuners
Ask anybody who has used locking tuners if they’d go back to standard, we call all but guarantee that every person you speak to would never dream of it. A good locking set of tuners will significantly improve reliability and tuning stability, and slash the time it takes to change a string with literally zero drawbacks.
The primary benefit is, of course, their locking mechanism, which grips the string tightly, drastically reducing the chance of string slippage and the subsequent loss of tuning vs wrapping the string around a tuning post. This is particularly beneficial for aggressive guitarists who strum or bend strings hard. Additionally, anybody who uses a standard tremolo bridge setup will immediately benefit from the improved tuning stability.
Some tuners even come with ratio gears. These units use a specific gear ratio, allowing for even more precise tuning. They’re set up so that each turn of the key results in a specific degree of pitch change, which when combined with the locking mechanism, results in the fastest possible string changes.
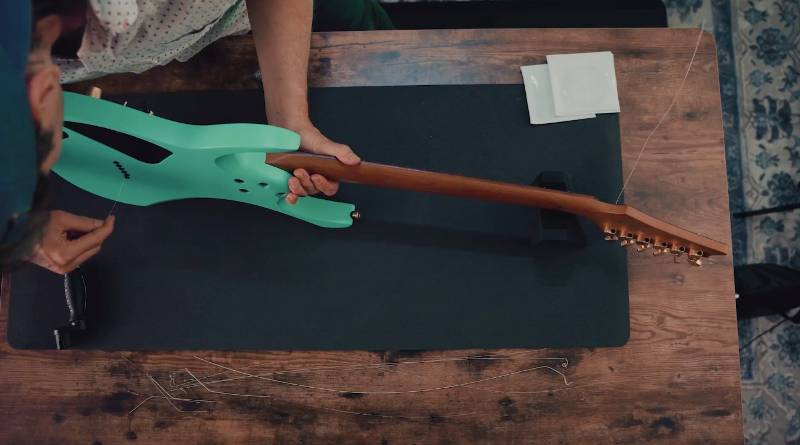
How To Restring a Guitar with Locking Tuners

Locking tuners definitely speed up the string changing process, but as with any other guitar maintenance job, doing it the right way starts before you even touch the strings. Preparing your workspace, and gathering your tools and equipment are just as important with these as they are for regular machines.
If you’re in the middle of a gig and you need to change out a broken string, it’s pretty obvious that you just need to get it done quickly and worry about everything else later, but if you’re changing the whole set out, think about the environmental conditions. If you’re changing your strings in a cool, dry, climate-controlled facility and then you head right out to your open air gig in the middle of summer, there’s a good chance you’ll need to make adjustments before the show – so it might be a good idea to arrive at the venue early so you can change out and tune up in the same conditions as you’ll be playing in.
Choosing the Right Strings

While there are no strings specifically made for this kind of tuners, the strings you choose will still make a difference when it comes to installing a fresh set on your guitar. Remember that the alloys used, and the gauge of the strings will have an effect on the stretch and break in period of the strings. Light gauge strings will still stretch quite significantly, meaning you’ll still likely need to make tuning adjustments after a few hours of play. You could opt for heavier strings, but as they require more tension, they aren’t quite as comfortable and you might need to make truss rod adjustments to counter it.
The 1 2 3 3 4 5 and 5 4 3 3 2 1 Methods
When it comes to restringing guitars with these tuners, there really is a right way to do it. The 1 2 3 3 4 5 method, sometimes called the 5 4 3 3 2 1 method, is widely accepted as the best way to align the posts on your tuners for maximum stability.
Imagine the face of a clock, and think of the entry point of the tuning post hole as the second hand. The hole for the first string (high E) should be pointing towards 1 ‘o’ clock. The second, string (B), should be pointing at 2 ‘o’ clock. The third and fourth strings (G and D), should both be pointing to 3 ‘o’ clock. The fifth string (A) should be pointing to 4 ‘o’ clock, and the sixth string (low E), should be pointing at 5 ‘o’ clock. The strings should be installed and tuned in that order.
Some players prefer to go with the opposite, or 5 4 3 3 2 1 method, which is an identical post hole arrangement, but strung in reverse, starting with the low E and finishing with the high E.
This alignment allows for a straighter string path, reducing the likelihood of kinks. Not only that, but it also gives the top three strings some additional winds, which helps to prevent these unwound strings from slipping through the clamp and out of the peg hole as soon as you bend them.
Lay Your Guitar Down

Place your guitar down on its back on a sturdy workbench, table, bed, or other flat surface. Avoid using the floor as the risk of missteps and the resulting damage is high! Cover whatever surface you’re using with some carpet, a towel, cloth, or other soft covering to prevent scratches.
Support the Neck
Using a purpose made neck support, or even something as simple as a pillow, support the neck of your guitar close to the headstock. This will keep it most stable and prevent unfortunate and costly accidents.
Remove the Old Strings
If this is the first set you’re installing in your guitar since installing the tuners, you can skip this step.
Begin by turning the tuning posts using a string winder or by hand, relieving the tension gradually. Turn them until the hole is aligned with the fretboard, then unlock the tuner by slackening the clamp on the back of the tuning machine (or releasing whatever mechanism your tuners have).
Next, gently unwind the strings from the posts, and pull the old string out of the tuning post. If the end is kinked, you may want to clip the string at the half way point and pull the straight end through the hole to avoid damage to the mechanism.
If your guitar has a string through body, feed the loose end through until the string is out. Or, if your strings go through the saddles, or you have a stoptail bridge, pull from the ball end to remove the string.
Get the Tuning Posts in Position
This is good practice for any tuner but is a must on locking sets of tuners! With the string removed, turn each tuning machine until it matches the correct position for 1 2 3 3 4 5 string installation.
Threading and Locking the Strings

Next, it’s time to thread in the new strings and lock them down.
Start by feeding the first string (high E or low E depending on which method you’re using) through the bridge and pulling it taut to the headstock, but not at full tension. Engage the locking mechanism by tightening the locking wheel or pin at the back of the tuning machine, checking the string is held firmly but without excessive force. Tighten too much and you risk shearing off the string end.
While you’re doing this, you’ll need to multitask a bit. As you’re holding the string taught and locking down the mechanism, you should also be making sure that the string is correctly seated in the saddle groove and the corresponding nut slot.
Repeat this for the rest of the strings.
Tune Up
Unlike a standard non-locking set of tuners, you won’t need multiple turns of the machine head to tune the strings to pitch.
Using a reliable tuner, start to bring the strings to pitch one by one. If your guitar has a tremolo bridge, you’ll need to make sure it’s in the neutral position throughout the process. Once you’ve worked your way through all the strings, go back through them to make your fine adjustments as necessary.
Trim Off Any Excess
Once each string is tuned, take your string cutters and trim off the excess.
Some locking sets of tuners come with a built in snipper that automatically takes off the excess as you turn the knob to tune the string. If this is the case for you, then there’s no need to worry about doing this manually.
Proper String Stretching Techniques

After you’re all strung up and at the correct pitch, you’ll need to manually stretch your strings. This isn’t totally essential, but it will help with reliability and stability for the first few days, where strings are most likely to fall out of tune.
There are a couple of ways to go about doing this. For hardtail guitars, you can use the thumb and forefinger method, holding a string between your thumb and forefinger, pulling it away from the fretboard, and releasing it multiple times. Repeat for all the strings. Next, bend each string as far as you can as though you’re David Gilmour. When you’ve done this a few times, check the tuning and adjust as necessary.
If your guitar has a floating tremolo bridge, you can apply max tension to the strings and release repeatedly instead of using the thumb and forefinger method.
No matter which way you do this, you’re effectively stress-testing the strings, so be careful not to apply excessive tension for too long, as you may end up snapping them.
Final Checks and Maintenance
Once you’re done with stretching and retuning, it’s time for final checks and maintenance. The most important being the check of the locking mechanism security. Give the wheel a tiny nudge just to make sure it’s still tight
You’ll want to regularly check and maintain the locking mechanisms as part of your guitar care routine. Be sure to follow the manufacturer’s instructions when it comes to this, though. Some sealed units may not require any maintenance at all, while others might need periodic cleaning and lubrication.
Troubleshooting Common Issues
Some of the most common issues when it comes to this style of tuners include strings slipping, or mechanisms jamming.
Strings tend to slip when they aren’t properly locked in, or if there isn’t enough winding on the string post. You can prevent this from occurring by checking that the mechanism is properly engaged and that you have enough string around the posts.
If a tuner jams, this is most likely down to over-tightening, or debris being stuck in the mechanism. To address this, gently loosen and clean the tuner, being careful not to force any moving parts. A can of compressed air can help you to loosen and remove anything stuck in the tuner mechanism without needing to poke any implements inside that could possibly cause further damage.
FAQs
How often should I change my strings with locking tuners?
The frequency of changing your strings when using these tuners is no different to any other tuner type. The average player should look to restring every three months at minimum, and daily players should consider changing strings around once a month.
The type of strings you use also affects this, for example, if you use coated or stainless steel strings, you might get away with doubling this string change frequency.
Ultimately, the use of locking system tuners makes no difference to string life, but it does make the string changing process faster and easier.
How do I know if my tuners locking mechanism is properly engaged?
You’ll know that your tuners are properly engaged and holding when the string is firmly locked in place and doesn’t slip when tuning. After threading the string and tightening the locking mechanism, give it a gentle tug on check that it’s secure. If it slips or drops out of tune, you may need to further tighten the locking mechanism.
Will they affect the tone of my guitar?
Locking tuners should not impact the tone or sound of your guitar at all. There’s a slight chance that they might affect sustain if they are aftermarket tuners, and differ in weight to the ones that came with the guitar from the factory. If they’re heavier you might notice an improvement in sustain, if they’re lighter, you might notice a reduction – either way it would be an imperceptibly small difference.
Is it difficult to install a locking set of tuners?
Installing a locking set of tuners on your own shouldn’t be out of reach if you’ve got the right tools and you’re patient, however, the degree of difficulty does change depending on the type of guitar you’re installing them on, and the model of tuner you’re using.
In some cases, tuners can be installed without making any permanent modifications to the guitar. However, some might require drilling new holes or even routing out the string post holes. If you’re not comfortable doing this yourself, we’d highly recommend consulting a professional guitar tech or luthier.
Can they be used on any guitar?
The majority of guitars can accommodate these tuners in theory, but again, the compatibility depends on the guitar model you’re planning to install them on. Makers of aftermarket tuners tend to make tuners that closely mimic the dimensions and style of most OEM tuners,
We’d also recommend that you avoid “upgrading” your vintage or high end guitar with this style of tuners, as once again, you might need to make permanent modifications, and this can significantly affect value in a negative way.
How do I maintain my locking tuners?
Maintenance on these is generally pretty similar to any other tuner type. The best way to keep them working properly is to keep them clean, and dust them regularly, ensuring that they’re free of dirt and debris, and if the manufacturer calls for it, lubricate them at the recommended interval.
In addition to that, you can help to prevent issues by avoiding over tightening. Not only can this damage the strings you’re using, but if you consistently overtighten, you’ll slowly erode the gearing in the mechanism, which will eventually cause slippage.
Do they work well with tremolo systems?
Yes, a good locking set of tuners is a great upgrade for guitars with tremolo systems. Because of their improved tuning stability and reliability, they make tremolo arms much more usable, so you’ll be able to get the full benefit of your whammy bar almost like you were using a Floyd Rose.
Final Thoughts
You’ll notice that even for first-timers, the procedure for changing strings on a guitar with locking tuners is not only easier, but much faster than it would be with standard tuners. This upgrade is genuinely one of the best modifications you can make to any guitar – not only are changes faster, but tuning stability is vastly improved, and tremolo systems can be used to their maximum potential.
If you’re thinking about an upgrade to locking set of tuners, be sure to do your research on which types would be compatible with your guitar, and don’t be afraid to seek professional help if installation is beyond your comfort level. Once they’re on, experiment with the different installation and tuning methods, and above all else, have fun playing!